# The Campaña Theme

Congrats on purchasing the Campaña theme by Code Nation, from the [NationBuilder theme marketplace](https://themes.nationbuilder.com/)!

Code Nation's themes are the most functionally advanced themes on the market. Campaña is designed for action oriented political, advocacy, and non-profit campaigns that need to fundraise, collect volunteers, or chase petition signatures.

The Campaña theme can be applied to an existing NationBuilder site or a completely new one!

If you would like to start with the base Campaña site structure please reach out to us at the link below.

[Any questions? Get in touch!](https://www.codenation.com/contact_us)

## You can now use this step-by-step guide to launch!  🚀

<figure><img src="/files/-MP3w0NKDXotA7G3kQZn" alt="The Campana Theme"><figcaption><p>The Campana Theme</p></figcaption></figure>


# Creating a new site

This guide will walk you through the process of creating your new site step-by-step.

## Creating your new site:

1. Login to your nation with your username and password.
   * If you don't have an account you can create a free trial at NationBuilder [here](https://nationbuilder.com/create).
2. Using the sidebar navigate to **Website** and select the **+ New Site** option. E.g.

<figure><img src="/files/-LhYIEVyquwY6puUHsQY" alt="&#x22;+ New Site&#x22; option in NationBuilder" width="563"><figcaption><p>"+ New Site" option in NationBuilder</p></figcaption></figure>

3. Make sure to provide all the necessary information in the required fields.
   * We recommend selecting the option to start from a default site. This option will provide you with a pre-configured template to kickstart your new site.

<figure><img src="/files/-LhYYcumLbDyyD0clufW" alt="NationBuilders new site form"><figcaption><p>NationBuilders new site form</p></figcaption></figure>


# Activate your new theme

Learn how to apply your new Candidate theme on a new or existing site.

Congratulations on your new purchase of the Campaña Code Nation theme from the [NationBuilder theme store](https://themes.nationbuilder.com)! If you don't have an existing site, we recommend starting with a brand new one, unless you've already added content to an unpublished site.&#x20;

* To get started with creating a new site, follow our helpful guide [here](https://docs.codenation.com/ready-to-launch/create-a-new-site).&#x20;

{% hint style="warning" %}
*As the manager of the theme marketplace, NationBuilder will issue your new theme, which they commit to delivering within 24 hours of your purchase. As such, you may experience a slight delay between purchasing your theme and being able to apply it to your site.*
{% endhint %}

## Applying the Campaña Theme:&#x20;

1. Navigate to **Websites > Your Site** in Nationbuilders sidebar

<figure><img src="/files/-LhYWinTaWCl8Tt5nnbd" alt="Finding your site example" width="563"><figcaption><p>Finding your site</p></figcaption></figure>

2. Using the tab menu click **Theme** then select **Switch to a custom theme**.&#x20;
3. Find the Campaña theme in the list of available themes and click the **Switch To** button beside the  **Code Nation** theme you purchased to apply it your site.&#x20;

<figure><img src="/files/-LhYYk1az56bOVS6wOAh" alt="Finding and applying your Candidate theme" width="563"><figcaption><p>Finding and applying your theme</p></figcaption></figure>

4. You will now be redirected to a menu where you can select your theme colours. We recommend selecting whichever colour style best suits your campaign.

<figure><img src="/files/-LjneKcnfw1PrLIj1qWj" alt="Switching the colour style for your CodeNation theme" width="563"><figcaption><p>Switching the colour style</p></figcaption></figure>

<br>


# Setting Languages

Campaña provides you with the option to select between the Spanish and English languages.

## How to create an alternative language option

Most bilingual sites built on NationBuilder have a full site for each language. This is where Campaña comes in.

To create a separate Spanish version, follow the instructions here to create a new site:

{% content-ref url="/pages/-LhY9IKs7S3fjJCTBJ8n" %}
[Creating a new site](/campana/ready-to-launch/create-a-new-site)
{% endcontent-ref %}

On the homepage of the new site add the tag `Admin ES` to translate the site variables into Spanish

## How to add a language drop-down

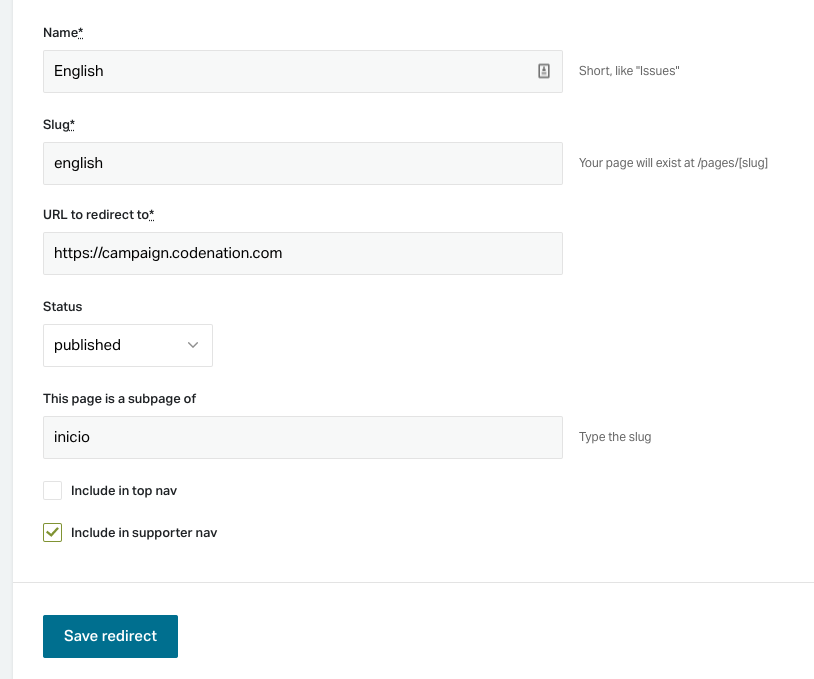
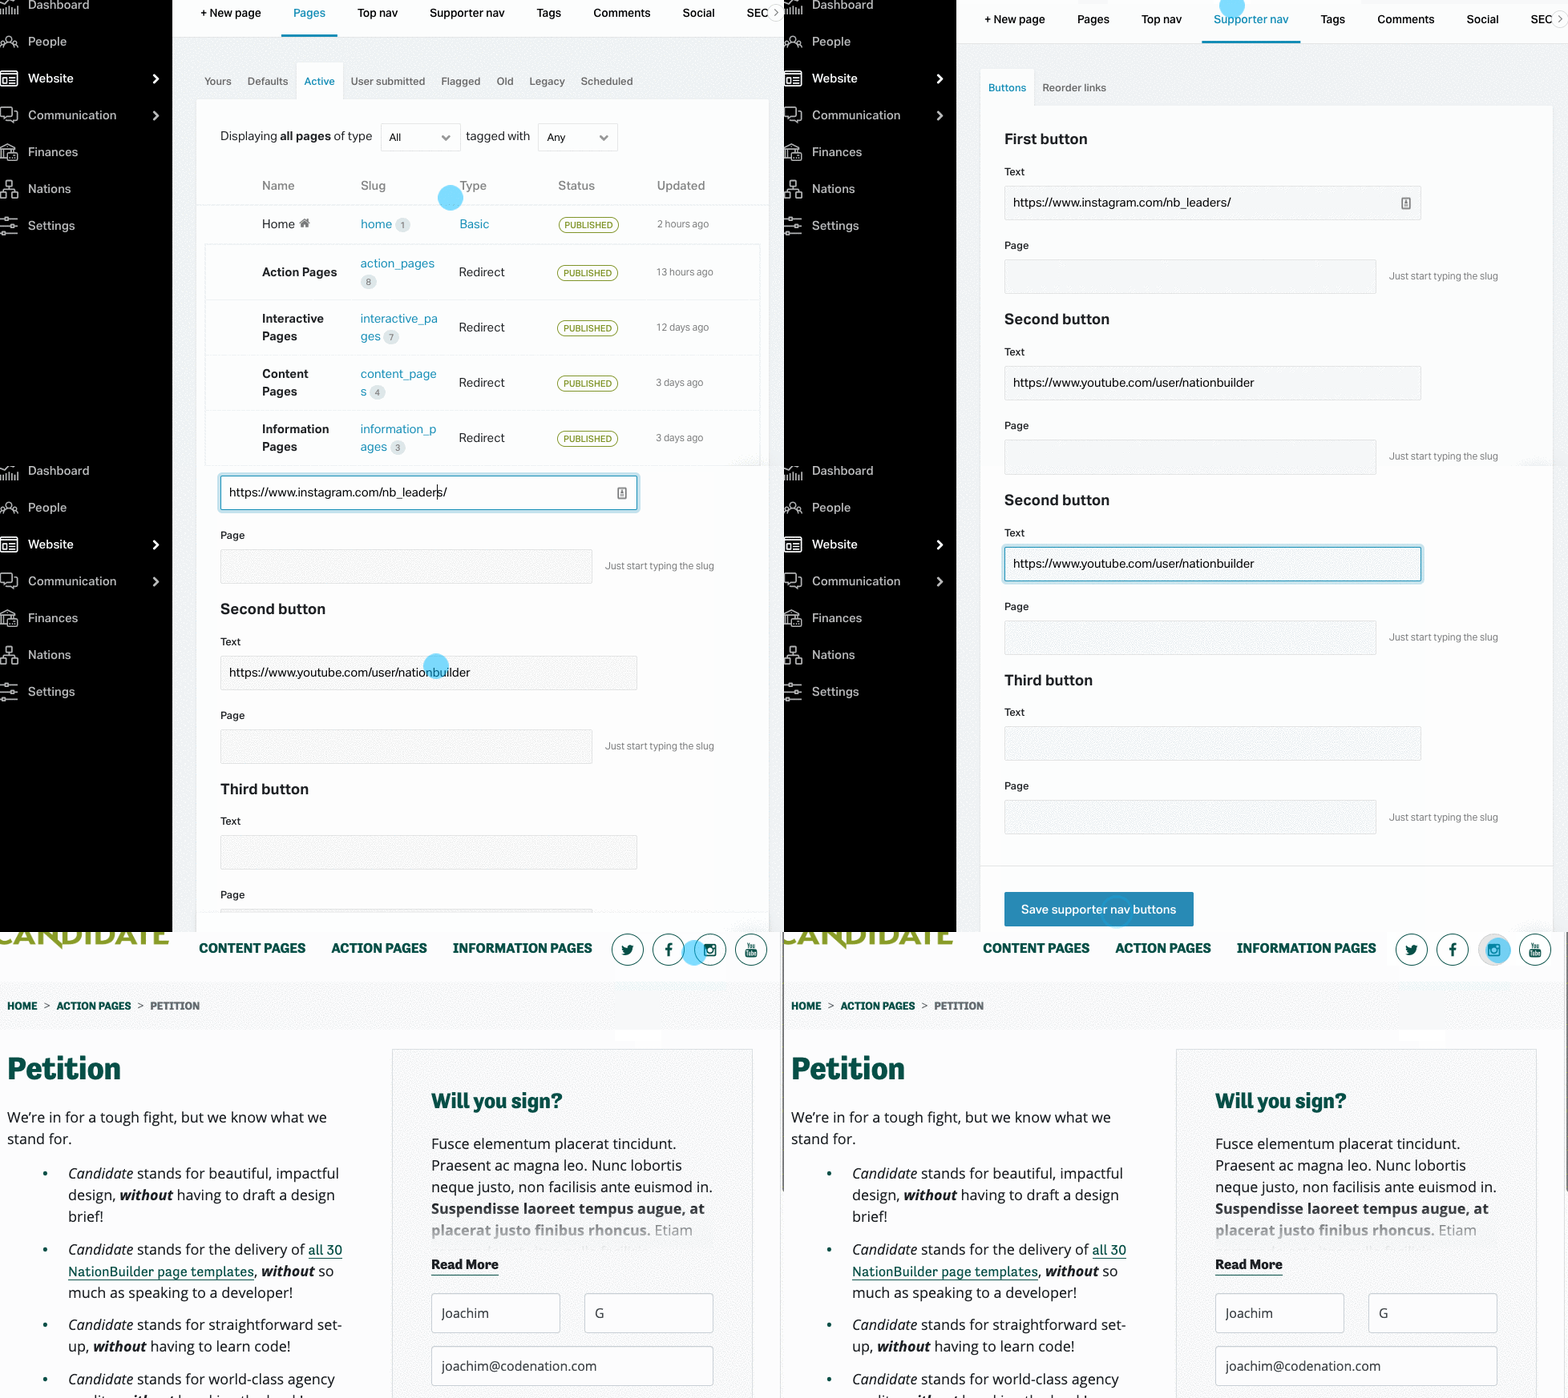
1. Create a redirect page for each language variant.
2. Check the box "Include in supporter nav".
3. Save your changes and preview the results.

<figure><img src="/files/-MKc7g3lVRp-VIzkyzSr" alt="Setting up language dropdowns"><figcaption><p>Setting up language dropdowns</p></figcaption></figure>


# Editing your theme

Learn how to customise your Code Nation theme and it's components by making changes to the template code.

{% hint style="info" %}
Before you can begin editing the template code, you need to create a clone of the theme.
{% endhint %}

This guide is for people and organizations who would like to edit the theme or alter some elements. If you try to access the edit screen for the main version of the theme shared with your nation you will see a permission denied error. This is because the theme is administrated centrally and admins can only edit themes that live in their nation.

## Cloning your new theme:

1. Follow the steps in our guide [*Activating your new theme*](https://docs.codenation.com/ready-to-launch/activate-your-theme) using your existing site or a brand new site. &#x20;
   * If your existing site is already published, we highly recommend opting for a brand new site to avoid any potential issues with the live site's appearance.
2. Navigate to **Websites > Your Site** in NationBuilders sidebar

<figure><img src="/files/-LhYWinTaWCl8Tt5nnbd" alt="Finding your site" width="563"><figcaption><p>Finding your site</p></figcaption></figure>

3. Using the tab menu click **Theme** then select **New Custom Theme** button.

<figure><img src="/files/zKXsGcCwHVwRJopOEs9E" alt="Adding a New Custom Theme" width="563"><figcaption><p>Adding a New Custom Theme</p></figcaption></figure>

4. You will now be redirected to a small form where you can name your cloned theme and select the option to clone from the current theme.&#x20;
   * **Note:** It may take several minutes for the theme cloning process to complete.&#x20;
5. Now that the cloning process is complete you can navigate to the "Current custom theme" tab to edit the theme files and make any changes you wish to apply to your version.

*Please note that we are unable to provide support for custom versions of our themes.*


# Connect a Broadcaster

Learn how to connect a broadcaster to begin sending direct communications to your supporters.

## Setting up a broadcaster:

1. Navigate to the **Communications** tab in the sidebar of NationBuilder.
2. Select the option to add a new broadcaster and fill in the form with your details.&#x20;

## Connecting the broadcaster to a website:

1. Connect an existing or new broadcaster to your site by navigating to **Website >Your Site** in NationBuilders sidebar and then selecting **Site Settings**.
2. On the right sidebar under **Defaults** you can update or select a default Broadcaster for your site.&#x20;

{% hint style="info" %}
Any new page that makes use of auto-responders (e.g. petitions or sign ups) will use this broadcaster by default. You can set individual broadcasters on a page level by navigating to the pages **Autoresponder** tab and updating the broadcaster field. &#x20;
{% endhint %}

<figure><img src="/files/-MHJXCdbke_9ZafPSMgG" alt="Setting broadcaster in NationBuilder at a page level"><figcaption><p>Setting broadcaster in NationBuilder at a page level</p></figcaption></figure>

## Syncing your social accounts:

Now that your broadcaster is created and linked to your site it's time to connect your socials. This will allow you to utilise all of NationBuilders integrations. (see twitter example below).&#x20;

1. Navigate to **Communications** and select the broadcaster you set up earlier via the sidebar in NationBuilder.
2. At the top of the page while viewing your broadcaster select "Connect your twitter account" option to sync it with NationBuilder.

<figure><img src="/files/-LjoAPDzwheOmZb6Ul9r" alt="Syncing your social accounts video"><figcaption><p>Syncing your social accounts video</p></figcaption></figure>


# Connect your social media icons

Effortlessly showcase your social media presence by adding social media icons to your website.

{% hint style="info" %}
By default, your sites broadcaster links will appear as icons on your site. To add other social media icons, follow the steps below.&#x20;
{% endhint %}

<figure><img src="/files/IfQctiTF3nJJgn6IGp6L" alt="Social media icons preview"><figcaption><p>Social media icons preview</p></figcaption></figure>

## Setting up your social media icons:

1. Log into your Nation and navigate to **Website > Your Site** via the Sidebar in NationBuilder.
2. Select the **Supporter Nav** from the tab menu.
3. On this page, you will find a form with three buttons, each of these corresponds to a separate social media icon displayed beside the navbar on your live site when using our theme.
4. For each button, add the URL of your social media account in the text section.
   * For example, if you want to add your Twitter profile, paste the Twitter URL into this section.
5. After adding the URLs, save the changes to this page.

{% hint style="info" %}
Please note that the default social links provided in this section support platforms such as Twitter, YouTube, LinkedIn, Facebook, Google+, and Instagram.
{% endhint %}

<figure><img src="/files/-LjoHpL2fuvgsY9rXQu8" alt="Setting up social media icons preview"><figcaption><p>Setting up social media icons preview</p></figcaption></figure>


# Connect Analytics

Learn how to create a free Google Analytics account, obtain the tracking code, and connect it to your website for data analysis and insights.

## Creating a free google analytics account:

To get started with Google Analytics, you'll need to create a free account. Follow these steps to sign up:

1. Go to the Google Analytics website: <https://analytics.google.com/>.
2. Click on the "Sign in" button in the top-right corner.
3. If you already have a Google account, sign in with your credentials. Otherwise, click on "Create account" to make a new Google account.
4. Follow the prompts to set up your account. Make sure to choose the correct options for your website or app.

## Obtaining your google analytics code:

Once you have your Google Analytics account set up, you need to get the tracking code for your website. The tracking code is a piece of JavaScript that you will need to add to your website's HTML to start tracking visitors and their behavior. Here's how to find your tracking code:

1. After signing in to your Google Analytics account, click on the "Admin" option in the lower-left corner of the page.
2. On this screen there will be a search bar at the top of the page. Start typing "Tracking" into the search bar and your tracking code (or "measurement ID") will show up as a search preview. Copy this code to your clipboard.

{% hint style="info" %}
The Google Analytics tracking code (or measurement ID) will be displayed in the format: `UA-XXXXXXXXX-X`.
{% endhint %}

## Adding analytics to your site:

1. Now that you have your tracking code you can navigate to **Websites > Your Site** via NationBuilders sidebar.&#x20;
2. Navigate to **Site Settings > Analytics Setup**.
3. Paste your tracking code into the "Google analytics code" form field and save the settings. E.g.

<figure><img src="/files/-LjoJ5dGygiP0b0Bccu6" alt="Where to find the analytics setup tab"><figcaption><p>Where to find the analytics setup tab</p></figcaption></figure>


# SEO and sharing

Essential tips and settings to optimize your website for search engines, increasing its visibility and reach.

## Granting Search Engines Access:&#x20;

Search engine optimization is an essential part of getting your website out to the world. There are several settings that can greatly affect the SEO of your website. The first allows search engines access to your website.&#x20;

1. Login to NationBuilder and navigate to **Websites > Your Website > Site Settings > Basic**. E.g.

<figure><img src="https://downloads.intercomcdn.com/i/o/130177358/7dfd4f205ee0b4acc93694f2/Screen_Shot_2019-06-25_at_1_33_52_PM_1.png" alt="Allow search engines checkbox" width="563"><figcaption><p>Allow search engines checkbox</p></figcaption></figure>

2. Select the checkbox "Allow Search Engines" if not already checked.
3. Click **Save Site**.&#x20;

## Optimizing Titles and Headlines:

The name of your website and individual pages can significantly impact your search engine optimisation (SEO) efforts. To ensure your site is visible to people searching for relevant content, it's essential to optimise titles and headlines throughout your site. Here's a step-by-step guide on how to optimize titles at both the site-wide and page-level settings:

### Site-wide settings

1. **Use keywords strategically:** Incorporate relevant keywords in the headlines and slugs associated with your site. This helps search engines understand the content and purpose of your website.
2. **Focus on the primary listing:** The most crucial field in site-wide SEO is the "Title of homepage in search results" text box. This title appears in search engine listings, and it's what users see first when your site comes up in search results. You can edit the main title for your site under **Site Settings > Basic**. E.g.&#x20;

<figure><img src="https://downloads.intercomcdn.com/i/o/130177546/0825dd7d56cd67b3f8d05e99/Screen+Shot+2019-06-25+at+1.38.21+PM.png" alt="Editing the title of the homepage in search results" width="563"><figcaption><p>Editing the title of the homepage in search results</p></figcaption></figure>

### Page level settings

1. **Customise page titles:** Just like site-wide settings, every page on your website has its own settings to control headlines, titles, and slugs. To access these settings, click **Website > Page > Settings > Page Settings**.

{% hint style="info" %}
All fields can affect SEO, but the most important field on this page is the “Title.” By default this field will autopopulate with “Name of page - Name of site.”
{% endhint %}

<figure><img src="https://downloads.intercomcdn.com/i/o/130177806/3523703c658fde3bb57dc624/Screen_Shot_2019-06-25_at_1_38_57_PM.png" alt="Page Settings" width="375"><figcaption><p>Page Settings</p></figcaption></figure>

#### Best practices for optimising titles:

1. Use relevant keywords: Ensure your title includes the most relevant words related to your content or target audience. This helps search engines connect your page with users searching for similar terms.
2. Craft sentence-like titles: Search engines tend to favor complete phrases over disjointed keywords. Create descriptive and engaging titles that read like natural sentences.
3. Keep titles concise: Aim to keep your titles within 55 characters or less. This ensures the entire title is displayed in search engine listings, providing users with clear and concise information about your page.

### Page-Level SEO Settings

To optimise your page's visibility and search engine ranking, it's essential to focus on specific SEO settings. To find these settings navigate to **Your Page > Settings > SEO**. E.g.

<figure><img src="https://downloads.intercomcdn.com/i/o/108168420/25242b2209b6be0fd49afacf/Screen_Shot_2019-03-11_at_2_06_31_PM.png" alt="SEO Settings" width="375"><figcaption><p>SEO Settings</p></figcaption></figure>

From here you can:

1. Customise the **Page Title**: If you haven't done so already, you have the option to change the title of your page. Ensure that the title accurately reflects the content and incorporates relevant keywords for better SEO performance.
2. Optimise the **Page Slug**: The page slug, or URL, also influences how search engines read and rank your site. You can change the slug at any time to make it more relevant to the content of your page, which can improve search visibility.
3. Update the **Headline**: The headline of your page is another critical area to include keywords. This not only helps with SEO but also appears on the page itself and in search engine listings, providing users with valuable information.
4. Fill out the **Excerpt** field: For higher rankings, ensure you provide an Excerpt for your page. This text will be displayed in search engine listings, providing a brief description of your page. Additionally, it appears when the page is shared on platforms like Facebook. Keep the Excerpt concise, consisting of a few sentences summarizing your content. If left blank, search engines will use the initial sentences from your page's content.

<figure><img src="https://downloads.intercomcdn.com/i/o/76104949/6de2efeb6d874400efb3678d/Screen_Shot_2018-04-06_at_9_16_48_AM.png" alt="Search Engine Listing Example"><figcaption><p>Search Engine Listing Example</p></figcaption></figure>

## Content Modifications for Better SEO:

There are several ways you can make a positive impact on your SEO by modifying and enriching the content of a page. Here are some examples:

1. **Utilise HTML anchor tags for internal and external links:** Use HTML anchor tags to create links within your website (internal links) and to link to pages outside your site (external links). When creating internal links or linking to other pages on your site, make sure to hyperlink relevant keywords. This helps search engines associate those keywords with your page, ultimately enhancing your search engine listing and improving overall SEO performance.

<figure><img src="https://downloads.intercomcdn.com/i/o/76104952/32fc961d0b62dacbc77a3f5a/Screen_Shot_2018-04-06_at_9_21_29_AM.png" alt="Embedding hyperlinks in NationBuilder" width="375"><figcaption><p>Embedding hyperlinks in NationBuilder</p></figcaption></figure>

{% hint style="warning" %}
**Note:** SEO can be negatively impacted if you include links that do not work.
{% endhint %}

2. **Write descriptive image descriptions:** Whenever you add images to your page, be sure to provide descriptive image descriptions. These descriptions should include relevant keywords that align with the content of the image and the page it appears on. Search engines read these descriptions and consider them when ranking your page. Incorporating descriptive image descriptions is an effective way to boost your page's SEO performance.

<figure><img src="https://downloads.intercomcdn.com/i/o/76104954/04b0102e925b2f01e40633d4/Screen_Shot_2018-04-06_at_9_21_17_AM.png" alt="Editing Image Content in NationBuilder"><figcaption><p>Editing Image Content in NationBuilder</p></figcaption></figure>


# Add a favicon

Favicons are small, iconic images that represent your website and appear in various locations, such as browser tabs, bookmarks, and browser address bars.

{% hint style="info" %}
Favicons are typically 16x16 pixels, but it's recommended to create a higher resolution version (e.g., 32x32 pixels) to ensure clarity on high-pixel screens.
{% endhint %}

## Adding your favicon:

1. Login to NationBuilder and navigate to **Your Site > Site Settings**.&#x20;
2. Select the Favicon tab and upload your new favicon into the file field.

<figure><img src="/files/-LheyHcPg47-LVyyIXmb" alt="Favicon Tab in NationBuilder"><figcaption><p>Favicon Tab in NationBuilder</p></figcaption></figure>


# Add a logo

Showcase your website's primary logo in the Navbar, while also serving as the default image in donation receipts and various sections of the control panel, including some email blast themes.

## Uploading a Logo

1. Navigate to **Site Settings**.
2. Select the **Logo** tab.
3. Upload the logo file you want to use.

<figure><img src="/files/-Lhen3qRU4AbKZ1HQUda" alt="Upload your logo under &#x22;Site settings&#x22; > &#x22;Logo&#x22;" width="375"><figcaption><p>Upload your logo under "Site settings" > "Logo"</p></figcaption></figure>

{% hint style="info" %}
For optimal display, we recommend using a logo with dimensions of 1200 x 400 pixels to maintain an aspect ratio of 3:1. However, there is no strict requirement on logo proportions, allowing some flexibility in size.
{% endhint %}

## Uploading a logo variant for dark background

If you have a separate white version of your logo intended for use on dark backgrounds, you can upload it to the "files" section with the filename "light-logo" of your websites homepage.  Once uploaded, this logo variant will automatically be used on pages featuring a content slider.

### Adding the light logo variant:

1. Navigate to **Your Site > Homepage** in NationBuilder.
2. Select the **Files** tab.
3. Upload the light logo file ensure the file name includes "light-logo.".

<br>


# Add a featured image

Learn how to create engaging content sliders to showcase images, headlines, and paragraphs at the top of your pages.

<figure><img src="/files/-MSf3boDCrE1l9krz0sM" alt="Campaña featured content slider example"><figcaption><p>Campaña featured content slider example</p></figcaption></figure>

## Uploading a featured content slide:

{% hint style="info" %}
By default, the featured image has a white overlay on the left-hand side. You can remove this overlay by adding the word 'none' or to change this to a dark/black overlay you can add the word 'dark' to the **label** of the featured image slide.
{% endhint %}

1. Navigate to **Settings > Featured content sliders** on the back-end of any page in NationBuilder.&#x20;
   * You can also navigate to this section via the control panel shortcut when previewing the page. E.g.&#x20;

<figure><img src="/files/-LjoTjZr71nZQ29sxI9o" alt="Control Panel Shortcut Preview"><figcaption><p>Control Panel Shortcut Preview</p></figcaption></figure>

2. To add a new featured content slide, start by filling out the form.
   * For a single headline, enter one line of text in the headline field.
   * For a **Heading** and **Subheading**, input your headline and subheading in the headline field, separated by a vertical pipe "|". (E.g. "Heading Text | Subheading Text")
   * To display a button/link to a specific page on your site input the slug of a page in the **page to feature** field. If you do not want to showcase another page/link you can input the current pages slug.&#x20;

{% hint style="info" %}
More than one **Featured content slider** in the same page will create a slider of images or carousel, instead of a one static image. More than one image in a same slider will require standarized image sizes or images with the same proportions.
{% endhint %}

<figure><img src="/files/-Lhf0BGq-OSb20MwYCAn" alt="Navigating to the featured content slider of a page"><figcaption><p>Navigating to the featured content slider of a page</p></figcaption></figure>

### Adding a featured content slider to a donation v2 page

{% hint style="info" %}
There is no Featured Content Sliders tab in the page settings of donation v2 pages. It is still possible to add a featured content slider to these pages, by following the steps below.
{% endhint %}

1. Navigate to the your nations donation page's settings.&#x20;
2. Note that this will take you to a url that looks something like: <https://your-nation.nationbuilder.com/admin/sites/184/pages/10287/**edit>\*\*
3. Replace the *edit* at the end of the url noted in step 2 with *features. E.g.* <https://your-nation.nationbuilder.com/admin/sites/184/pages/10287/**features>\*\*
4. This will take you to the Featured Content Slider settings for your donation page.&#x20;
5. Follow the steps outlined in [#uploading-a-featured-content-slide](#uploading-a-featured-content-slide "mention")


# Add footer text

Learn how to add contact information, acknowledgements to country, disclaimers or more to the footer of your site.

## Adding footer text:

1. Navigate to **Your Site > Site Settings**.
2. Select the footer tab and begin typing your footer content.&#x20;
   * E.g. Authorised by Jimmy B, Your Organization Sydney. (232) 219 19 19 © Copyright 2030

<figure><img src="/files/-Lhf10SonBTxkr65-1FS" alt="Where to add footer text"><figcaption><p>Where to add footer text</p></figcaption></figure>

{% hint style="info" %}
**Note:** The line "Created using the theme by [Code Nation](https://www.codenation.com/?codenation) on [NationBuilder](https://nationbuilder.com/?recruiter_id=716045)" is required on all themes bought on the theme marketplace. Please get in touch <info@codenation.com> for any further customisations.
{% endhint %}


# Order your navbar

Learn how to update and re-order your nav items.

1. Navigate to **Your Site > Site Settings.**
2. Selec the **Top nav** tab menu.&#x20;
3. On this page you can drag and drop the order of your pages by hovering over the

You can re-order the top nav elements under **Site Settings.**

<figure><img src="/files/-Lhf28D6MzRWTamEWUS5" alt="Where to find the top nav to reorder nav items"><figcaption><p>Where to find the top nav to reorder nav items</p></figcaption></figure>


# Configure your page and site settings

We strongly recommend that you view our site launch checklist [here](https://docs.google.com/document/d/1R5aH3yHIrrj0Rdm9rbFOyf78GvUvWd8XltAf63LWN8I/edit?tab=t.0#heading=h.8jc44ow2248b), before launching your site. This includes advice on:

1. [Finalising individual page content and settings](https://docs.google.com/document/d/1R5aH3yHIrrj0Rdm9rbFOyf78GvUvWd8XltAf63LWN8I/edit#heading=h.agxscs5juatm)
   1. [Content and headline](https://docs.google.com/document/d/1R5aH3yHIrrj0Rdm9rbFOyf78GvUvWd8XltAf63LWN8I/edit#heading=h.xncvqnqlmtux)
   2. [Feature image](https://docs.google.com/document/d/1R5aH3yHIrrj0Rdm9rbFOyf78GvUvWd8XltAf63LWN8I/edit#heading=h.9zlva2y990do)
   3. [Social media content](https://docs.google.com/document/d/1R5aH3yHIrrj0Rdm9rbFOyf78GvUvWd8XltAf63LWN8I/edit#heading=h.bhn6judgzdso)
2. [Finalising action pages](https://docs.google.com/document/d/1R5aH3yHIrrj0Rdm9rbFOyf78GvUvWd8XltAf63LWN8I/edit#heading=h.7h9lhu7sghd0)
   1. [Autoresponse emails (esp. for donation pages)](https://docs.google.com/document/d/1R5aH3yHIrrj0Rdm9rbFOyf78GvUvWd8XltAf63LWN8I/edit#heading=h.9jn8r7w4kme1)
   2. [Set up payment processors for all donate pages](https://docs.google.com/document/d/1R5aH3yHIrrj0Rdm9rbFOyf78GvUvWd8XltAf63LWN8I/edit#heading=h.257rl2iampp1)
   3. [Set up a landing pages](https://docs.google.com/document/d/1R5aH3yHIrrj0Rdm9rbFOyf78GvUvWd8XltAf63LWN8I/edit#heading=h.s16dv0rciozp)
3. [Finalising custom features (if applicable)](https://docs.google.com/document/d/1R5aH3yHIrrj0Rdm9rbFOyf78GvUvWd8XltAf63LWN8I/edit#heading=h.u3ktlbduxjg9)
   1. [Upload content / headlines / images / tags etc](https://docs.google.com/document/d/1R5aH3yHIrrj0Rdm9rbFOyf78GvUvWd8XltAf63LWN8I/edit#heading=h.68g5tdj98fgx)
4. [Tracking and data analytics setup (optional)](https://docs.google.com/document/d/1R5aH3yHIrrj0Rdm9rbFOyf78GvUvWd8XltAf63LWN8I/edit#heading=h.op6n89vjyg66)
   1. [Apply tags to action pages - donate, petition, signup, volunteer, event pages](https://docs.google.com/document/d/1R5aH3yHIrrj0Rdm9rbFOyf78GvUvWd8XltAf63LWN8I/edit#heading=h.yy3gt736wdw5)
   2. [Set up donation tracking codes](https://docs.google.com/document/d/1R5aH3yHIrrj0Rdm9rbFOyf78GvUvWd8XltAf63LWN8I/edit#heading=h.mk2qw23rqntm)
   3. [Set up google analytics](https://docs.google.com/document/d/1R5aH3yHIrrj0Rdm9rbFOyf78GvUvWd8XltAf63LWN8I/edit#heading=h.zcjucsqi6uuc)
   4. [Set up SEO](https://docs.google.com/document/d/1R5aH3yHIrrj0Rdm9rbFOyf78GvUvWd8XltAf63LWN8I/edit#heading=h.th4b6geduh5o)
5. [Email notifications and point people](https://docs.google.com/document/d/1R5aH3yHIrrj0Rdm9rbFOyf78GvUvWd8XltAf63LWN8I/edit#heading=h.t400xe304t55)
   1. [Email notifications](https://docs.google.com/document/d/1R5aH3yHIrrj0Rdm9rbFOyf78GvUvWd8XltAf63LWN8I/edit#heading=h.wqew2z3cx668)
   2. [Point people](https://docs.google.com/document/d/1R5aH3yHIrrj0Rdm9rbFOyf78GvUvWd8XltAf63LWN8I/edit#heading=h.jicxhya5tx3r)


# Control Panel Shortcuts

Navigate to useful sections in NationBuilder using the control panel shortcut.

Logged in admins can easily navigate to the back-end by clicking the blue icon in the bottom right of the screen.

<figure><img src="/files/Fu1c4dJgwXsR9Gb4XuFk" alt="Control panel shortcut"><figcaption><p>Control panel shortcut</p></figcaption></figure>

Once you open the Control Panel, you'll find easy-to-use shortcuts for the following actions:

1. Preview the page.
2. Edit the pages featured image.
3. Edit the pages seo sharing settings.&#x20;
4. Find the theme documentation.
5. Edit the backend of the page.
6. Navigate to your sites control panel or dashboard.


# Creating new pages

Learn how to create new pages.

{% hint style="info" %}
Code Nation's templates include all 30 of [NationBuilders page templates](https://support.nationbuilder.com/en/articles/2319593-types-of-nationbuilder-pages).&#x20;
{% endhint %}

## Creating new pages

1. To create a new page navigate to **Website** > **New page.**
2. Choose the type of page and give it a name, the slug will be created automatically and is part of the url of each page.

<figure><img src="/files/upx66H6uFFyZSNUlwATI" alt="Where to find the new page button"><figcaption><p>Where to find the new page button</p></figcaption></figure>

Once you create the page using this form, you can easily access it in NationBuilder. From there, you have the option to upload Featured Content slider images, update SEO settings, and manage Sharing/Social Media preferences.

<figure><img src="/files/-LhgwtJtyJnZwfcH9fUE" alt="Where to find these additional page settings"><figcaption><p>Where to find these additional page settings</p></figcaption></figure>

The **Sharing** or **Thumbnail** images can be uploaded under **Settings** > **Social Media** for every page, subpage, post or event. In some cases, this image will appear as the thumbnail, for example, in Blog or Calendar pages; the Blog Post or Event pages need thumbnail images to show in the Blog and Calendar, respectively, and in the sections showing Latest News or Events.

![](/files/-LhgxzxDSIcZBTo5T0tx)

## Creating new subpages

1. Navigate to the **Subpages** tab of any page in NationBuilder.
2. Click the **new subpage** button.&#x20;

<figure><img src="/files/7TU2zsRYaMA3mzrpd86G" alt=""><figcaption><p>Where to find the new subpage button</p></figcaption></figure>


# Donation Express Payments

Offer faster and more convenient payment options for donors using Donation Express Payments.

{% hint style="info" %}
Live Example: <https://candidate.codenation.com/donation_express>
{% endhint %}

<figure><img src="/files/oUv6T5SFWFQ7hSfOp3aN" alt="Donation Express Payments"><figcaption><p>Donation Express Payments</p></figcaption></figure>

## How to update your Candidate theme to support express payment options?

{% hint style="info" %}
If you have [enabled express payment options for your website](https://support.nationbuilder.com/en/articles/5628862-express-payment-options#h_0d26cb83ce) but the new options are not appearing on your pages, use this guide to update your custom Candidate theme.
{% endhint %}

### About Express payments

Enabling express payment options for your website will allow donors to contribute using Apple Pay, Google Pay, or credit card they've saved to their browser. By making these payment options available, you will:

1. Minimize the time it takes for donors to contribute
2. Make it easier for people to donate from their mobile devices
3. Provide an added sense of security by allowing donors to avoid manual credit card input

All of these factors can increase donation conversion rates, giving your organization the means to better promote your cause.

*📌 Note: This feature is only available on Donation (v2) pages using NationBuilder Payments.* [*Learn more.*](https://nationbuilder.com/payments)

### Step 1: Take a backup of your theme

{% hint style="danger" %}
Before changing theme files - download a backup of your current custom theme.

Theme > Current custom theme > Download
{% endhint %}

<figure><img src="/files/AWKTPApvZrOXnQx6y5t3" alt="How to download your theme"><figcaption><p>How to download your theme</p></figcaption></figure>

### Step 2: Updating the theme code

1. Download theme files from [here](https://www.codenation.com/campana_express_payments).
2. Upload "\_styles\_staged\_donations.scss" to your theme files and replace the old version.
3. Upload "pages\_show\_donation\_v2\_wide.html" to your theme files to replace the old version.
4. In NationBuilder navigate to your the Candidate Themes files and publish your changes. <br>


# Tags

Tags are a great way to allow supporters to search for relevant content within NationBuilder

## Adding tags

1. Navigate to **Your Site > More > Tags**

<figure><img src="/files/CkvfmjFunMlsrm1sEht3" alt="How to navigate to the tags section in NationBuilder" width="563"><figcaption><p>How to navigate to the tags section in NationBuilder</p></figcaption></figure>

2. Here you can find options to edit, create or remove existing tags.&#x20;

## Adding Page Tags

1. To add a tag to a specific page, navigate to the page in your nation.
2. Click the "Add Tag" button and begin typing your tag (as shown below).&#x20;

<figure><img src="/files/-LjoXhtqjb4XtpHVQiuz" alt="How to add page tags"><figcaption><p>How to add page tags</p></figcaption></figure>

These page tags will appear in the content of the live page as a link to other pages tagged the same way. Custom tags that are a feature of our Code Nation theme and contain "Admin" are excluded from being shown on the live site.

<div align="center"><figure><img src="/files/-LjoX2-d_0JGEF9Jef6a" alt="Climate Change tag preview"><figcaption><p>Climate Change tag preview</p></figcaption></figure></div>


# Action Slider

## How to add an action slider to any page

1. Add the tag `Admin Show Action Slider` to the page you want the action slider to appear on
2. Add the tag `Admin Action Slider` to any page that you would like to feature on the slider
3. Add a share image, and excerpt to have it appear in the slider

![](/files/-MJ9wyxPW61xBooPxRMW)


# Background Video Section

Live demo: <https://campaign-codenation.nationbuilder.com/>

1- Create a new basic page and add your youtube URL to the body of the page. When pasting the URL be sure to paste it without formatting (i.e. without a hyperlink, underline, etc.).

![](/files/-MHJxNYTtPje3-Xmv7U4)

2- Add the tag `Admin Show Background Video:[VIDEO_SLUG]`  to the page you want the video to appear. i.e. `Admin Show Background Video:celebration`&#x20;

3- You can overlay a quote on the video by adding a headline to the video page.

![](/files/-MHJztdqMHjr4v8T6Fr7)

4- Given background videos are not supported on many mobile devices, you can set a fallback image to use as the background in this section on smaller screens. To do this, simply upload your desired background photo as the social media image for the page.


# Background Quote Section

Live demo: <https://campaign-codenation.nationbuilder.com/two_column_content>

1- Create a new basic page and add the quote to the content of the page

2- Upload the background image **Settings > Social Media**&#x20;

3- On the page you want the quote to appear, add the tag `Admin Show Quote:[QUOTE_SLUG]`. i.e. `Admin Show Quote:about_quote`&#x20;

We recommend using 1800 x 600 (i.e. an aspect ratio of 3:1).

That said, there is no hard limit or required proportions for these images, so some general rules to follow for optimal display are to ensure:&#x20;

* a minimum width of 1800px (to guarantee sufficient resolution)&#x20;
* an aspect ratio between 3:1 and 2:1 (i.e. landscape photos at least twice as wide as they are high, and not more than three times as wide as they are high)

[Read more image tips here](https://docs.codenation.com/tips/photos)

![](/files/-LjpaT5ZLzgiEHfuM588)


# Column Panels

## How to add panels:

Live demo: <http://campaign.codenation.com/>

1. Add the tag `Admin Show Content Panel:[PAGE_SLUG]` to the page you want the panels to appear on. i.e. `Admin Show Content Panel:about`&#x20;
2. In the content of the about page add 2 horizontal lines (`<hr>`) at the end of the each column. See image below:

<figure><img src="/files/lB44ovMwj3OlGUVEJPp7" alt=""><figcaption><p>There should be an odd number of double horizontal lines so that it separates each column correctly</p></figcaption></figure>

![](/files/-MJ706VKzkRVfbprRyn4)


# Collapsed Accordions

Live demo: https\://campaign.codenation.com/donation\_v2

## Accordion (collapsed content)

Accordions can toggle through a number of textblocks with a single click, and that greatly enhances the UX of your page.

### What are accordions?

**An accordion** is a component that organizes content within collapsable items.&#x20;

**Accordions** can toggle through a number of text blocks with a single click, and that greatly enhances the UX of your page.&#x20;

See the gif below, and the live demo at <https://campaign.codenation.com/donation_v2>

![](/files/-MJ9hmOO56GXJKdSMeCH)

## How to add an accordion/collapsed content?

In the content of a page add 2 horizontal lines (`<hr>`) at the start of the headline and start of the content. See image below<br>

![](/files/-MJ9iUhqE5JzRdUbea66)


# Cover donation fee

Add the tag `Admin Cover Fee` to any donation\_v2 page, to add the checkbox "I would like to cover the payment processing fee" to the bottom of your donation form.&#x20;

This will then calculate your payment processing fees and add it to the donation value that your supporter has selected. Note that the processing fees are calculated at the rate of 2.9% + 30c\*

See this in action at <https://campaign.codenation.com/donation_v2>

![](/files/lhseJoXJJqB1CNdicNc1)

![](/files/37qf51cl5gfWzM9qYQte)

\* or .3 of whatever unit of currency your site is using


# Custom Field Inputs

Code Nation themes are designed to accommodate dynamic and personalized custom inputs.

{% hint style="info" %}
Live Example: <https://campaign.codenation.com/join>
{% endhint %}

<figure><img src="/files/8AeI7h88z7uoTKRYX7vU" alt="" width="375"><figcaption><p>Custom Field Input Example</p></figcaption></figure>

## **What are dynamic custom inputs?**

Making use of our themes Admin tags, **Dynamic Custom Inputs** let you upgrade your forms by adding custom questions or input fields to actions on your website (like sign-ups and feedback forms) beyond what NationBuilder normally offers.&#x20;

You can learn more about custom fields [here](https://support.nationbuilder.com/en/articles/2340612-introduction-to-custom-fields).

## Adding a custom field input:

{% hint style="info" %}
Custom Field Inputs for Donation pages are tagged differently. You can jump to this section here: [#adding-custom-donation-field-inputs](#adding-custom-donation-field-inputs "mention")
{% endhint %}

1. Navigate to **Settings > Custom Fields** via the sidebar in NationBuilder.&#x20;
2. Select the button to create a new custom field.
3. In the "Name" field, write the label you want for the custom field input (for example, "How did you hear about us?"). Then give the new custom field a unique slug.
4. Navigate to the page you want to add the field to.
5. Add the tag `Admin Custom Field:[CUSTOM_FIELD_SLUG]` to the page you would like to add the custom field to.
   * Where `[CUSTOM_FIELD_SLUG]` is the slug you gave the custom field in step 3.

(Note: the video below shows our *Candidate* theme, but the steps are the same for Campaña)

![How to add a custom field in NationBuilder?](/files/-LjoaVuomXHHIlLrQVaU)

## Checking the response for custom field inputs

Once a visitor has filled and submitted a form with a custom field input, the value will be stored on their profile in your Nation. You can follow the steps below to find and view any users custom field responses.&#x20;

1. Navigate to **People** via the sidebar in NationBuilder.
2. There are a couple of ways you can find people and view their custom fields on this page.
   1. If you know the name of a person who interacted with your form you can search for them specifically.&#x20;
   2. If you set the form up to tag users with a specific tag (E.g. "Candidate -Sign Up - 2023") you can filter people using this tag by selecting the filter option.
3. Once you have selected a person you can then use the tab menu to navigate to **Edit > Custom Fields** to view all their responses. E.g.&#x20;

<figure><img src="/files/3sR7fvmwq97ElfsA2tGS" alt=""><figcaption><p>Where to find a custom fields response</p></figcaption></figure>

## Adding Custom Donation Field Inputs

1. Navigate to **Settings > Custom Fields** via the sidebar in NationBuilder.&#x20;
2. Select the donation tab via the tab menu.
3. Select the button to create a new custom field.
4. In the "Name" field, write the label you want for the custom field input (for example, "How did you hear about us?"). Then give the new custom field a unique slug.
5. Navigate to the page you want to add the field to.
6. Add the tag `Admin Custom Donation Field:[CUSTOM_FIELD_SLUG]` to the page you would like to add the custom field to.
   * Where `[CUSTOM_FIELD_SLUG]` is the slug you gave the custom field in step 3.


# Custom Donation Field Inputs

Wanting to ask something on an action that isn't available in NationBuilder's standard inputs? The good news is that Code Nation themes support **dynamic custom inputs.**

What are dynamic custom inputs?

By using Admin tags we can add custom fields to any donation action on the site. Read more about custom fields here <https://nationbuilder.com/when_to_use_custom_fields>.

1- Create the new custom donation field Settings > Custom Fields > Donations\
2- Navigate to the page you want to add the field to\
3- Add the tag to the page `Admin Custom Donation Field:[CUSTOM_FIELD_SLUG]` (i.e. `Admin Custom Donation Field:hear_about_us`)


# Donation Panel

Live demo: <https://campaign-codenation.nationbuilder.com/>

If your site has a donation page the homepage will automatically input a Donation Panel below the featured content slider. You can **hide** this from the homepage by adding the tag `Admin Hide Donation Panel`.&#x20;

You can also **show** this on pages other than the homepage by adding the tag `Admin Show Donation Panel`.

![](/files/-MHK213ytW1JYT21gHkf)

The text can be modified under the headline of the default donation page.

{% hint style="info" %}
This donation bar is connected to the primary donation page set in Pages > Defaults > Primary donation page
{% endhint %}


# Event Calendar

## How to add an event Calendar view

Live example: <http://campaign.codenation.com/events_calendar>

1. Create a calendar page type or navigate to an existing calendar
2. Add the tag `Admin Show Event Calendar`
3. Events will automatically appear in the calendar view as shown below

![](/files/-MJ7Ddt4mKVpCUnB0dSS)


# Events Map

Live demo: <https://candidate.codenation.com/>

1. Create a calendar with events or use an existing one.
2. Add the tag `Admin Show Events Map:[CALENDAR_SLUG]`  to the page you want the video to appear. i.e. `Admin Show Events Map:upcoming_events`&#x20;
   * Alternatively, use the tag `Admin Show Events Top Map:[CALENDAR_SLUG]` to show the map at the top of the page

![](/files/-MHKCfRqP0wi2dwHa88O)


# Event Program Layout

Live Demo: campaign.codenation.com/event\_program\_layout

## How to add an event program layout to any page.

1. Create a basic page with a basic subpage for each days schedule
2. Navigate to the page you would like the program to appear on.
3. Add the tag "`Admin Program:[page_slug]`" where "\[page\_slug]" is the slug of the page set in step 1.

See the gif below, and the live demo at: <https://campaign.codenation.com/event_program_layout>

<figure><img src="/files/LOS1tBq4rSsvgsfmO7IX" alt=""><figcaption></figcaption></figure>


# Embedding External Tools/Plugins

Live Demo: <https://campaign.codenation.com/external_plugins>

If you want to embed an external tool like [Juicer.io](https://docs.codenation.com/campana/admin-tag-customisations/www.juicer.io), [Dogooder](https://dogooder.co/), etc. on an NB page, have a couple of ways of doing it. On any NB site it's possible to create a custom page template and add the external tool's embed code directly to the page template.&#x20;

However, with our themes you can also create your own embedded section without touching any code! Just follow the instructions below:

1. Create a basic page for your external snippet code&#x20;
2. Add the embed code given to you from the external plugin to the excerpt of the page - Settings > Social Media > Excerpt for Facebook
3. On the page you want the embedded content to appear, add the tag `Admin Show Embed:[SNIPPET_SLUG]`.&#x20;
   1. Where `[SNIPPET_SLUG]` is the slug of the page you created in step 1 (I.e. `Admin Show Embed:social_media_stream`)

![](/files/-M0FPfCkKsHyU1m0NWW1)

<br>


# Feature Petition

## How to add a feature petition to any page

1. On the page you want the petition to appear add the tag `Admin Show Petition:[slug_of_petition]`

{% hint style="warning" %}
This tag should only be used on basic pages i.e. the homepage
{% endhint %}

![](/files/-MJ9ySvjhbFGoKfP9_3o)


# Feature Video

Demo: <https://campaign-codenation.nationbuilder.com/>

1. Create a new feature **Page > Featured content sliders**&#x20;
2. In the Label include the word "Background"
3. In "Page to feature" add the slug of a page that has a Youtube URL in the content of the page.
4. Upload an image to be the placeholder whilst the video loads

See the screenshot below as an example. Note the page with slug *celebration\_2* has a youtube video url pasted into its content section.

![](/files/-MJ7EQvolBqNiJ6Z4CAP)


# Featured Blog Post

Your Blog page will display your blog posts in order of most recently published. However, you can apply the `"Admin Featured Post"` tag to up to 2 of your blog posts, to make them stand out from the rest at the top of your Blog page. See this in action with the 2 featured posts shown at the top of the screenshot below, and at <https://campaign-codenation.nationbuilder.com/news>

![](/files/-MHKGCUZhKJQCNbJ8dxp)


# Feature Image Fade Options

With this guide you can default white fade overlay on feature content slider images.

![](/files/-MSf6ioTZxS_GA-BpJoT)

## How to make the feature fade color dark?

1. Create a new feature slider or navigate to your current one. **Settings > Featured content sliders**.&#x20;
2. Add "`dark`" to the **Label**
3. Save

![](/files/-MSf6kzZeImND8iw7HYu)

## How to remove the feature color?

1. Create a new feature slider or navigate to your current one. **Settings > Featured content sliders**.&#x20;
2. Add "`none`" to the Label
3. Save


# Hide Tweet Section

If you have your social media accounts connected to your broadcaster (see Connect a Broadcaster above), then your latest tweet will automatically display at the bottom of each page on your site, just like on the [Campaña site](https://campaign-codenation.nationbuilder.com/) (screenshot below). To prevent your latest tweet from displaying on any page, just add the page tag `"Admin Hide Tweet Section"` to that page.&#x20;

![](/files/-MHJu4AbZb8Bgs9HMbcc)


# Image Gallery

Live demo: <https://campaign-codenation.nationbuilder.com/image_gallery>

1- Create a basic page for your image gallery with the tag `Admin Show Image Gallery`\
2- Create a basic subpage for your image collection (i.e. 2036 Annual Event Catchup)\
3- Add a Featured content slider images to that subpage under **Settings > Featured content sliders**

![](/files/-MHKMYpkb-vtjFcw8h2U)

![](/files/-MHKMTb1f9BYFxskH8ME)


# Latest News Section

Demo: <https://campaign-codenation.nationbuilder.com/>

If your site has a blogposts the homepage will automatically input a latest news panel. You can **hide** this from the homepage by adding the tag `Admin Hide Latest News Section` to the homepage.&#x20;

You can also **show** this on pages other than the homepage by adding the tag `Admin Latest News Section`.

The latest news section shows the 3 most recently published blog posts on the site. Share image, headline, snippet of content and read more button. Upload a share image to each blog post to show the thumbnail **Settings > Social Media.** If no image is added a default picture with your logo will be added

![](/files/-MHKMvAX3iHnIncBVTDd)


# Nav Buttons

Primary action buttons drive supporters to take action for your top level asks.

![](/files/-MHKNC-0oFYN9CsV2UZ6)

By default the Candidate theme will add the default Signup, Donation & Volunteer pages (if they exist). These can be configured by navigating to Pages > Defaults.

![](/files/-MHKNcncGilC5UqUo9OM)

To add different primary action buttons you can add the tag **`Admin Nav Button`** to the backend of any page.


# Resources page

Live demo: <https://campaign-codenation.nationbuilder.com/resources>

1. Create a basic page to hold all your resources
2. Create a subpage for each resource
3. Upload your attachment under the **Files** section of the subpag&#x65;**.**
4. Add the tag `Admin Show Resources:resources_slug` (where `resources_slug` is the slug of the page holding the resource subpages) to the page you want the resources to show on (this can be the same page you're already on)

{% hint style="info" %}
You can create a redirect page as a subpage for files that are hosted externally. This works great for google docs or files larger than 10mb
{% endhint %}

<figure><img src="/files/27cI1QaF3sGGRAxQlqyc" alt=""><figcaption></figcaption></figure>

![](/files/-MJ72ziseqIYFUBLwYmK)


# Share Bar

Live demo: <https://campaign-codenation.nationbuilder.com/about_me>

`Admin Show Share Bar` will show a bar with Facebook and Twitter buttons that prompt supporters to share the current page.

![](/files/-MHKQp6WNLYpho3thU-V)


# Share Parent Bar

Similar to the share bar,  `Admin Show Share Parent Bar` will show a bar with Facebook and Twitter buttons that prompt supporters to share the parent of the current page.&#x20;

![](/files/-MHKQzWa0uSz98KlgTst)


# Show Subpages

Live demo: <https://campaign-codenation.nationbuilder.com/what_i_stand_for>

The tag `Admin Show Subpages` will show the subpages of a pag&#x65;**.** Share headline, image, snippet of content and read more button. Upload a photo under **Settings > Social Media.** Note that the subpages display in order of most recently published.&#x20;

You can also show a specific page's subpages by adding the tag `Admin Show Subpages Panel:[page_slug]`  - i.e. The candidate homepage has the tag `Admin Show Subpages Panel:what_i_stand_for`which shows the subpages of the page "what\_i\_stand\_for".

![](/files/-MHKSy12lCms1slYaF6N)

![](/files/-MHKSLUJI_PMgqTgw39Q)


# Show Profile Page

Live demo: <https://campaign-codenation.nationbuilder.com/about_me>

The tag `Admin Show Profile Page:[page_slug]` works very similarly to the  tag `Admin Show Subpages Panel:[page_slug]`(see 'Show Subpages' for more detail).&#x20;

Essentially applying the`Admin Show Profile Page:[page_slug]` tag will show the subpages of the \[page\_slug] page, in a style that is suited to an individual's profile (i.e. with a rounded profile photo, and longer bio section). The preview includes a headline, image, and snippet of content. Upload a photo under **Settings > Social Media.** Note that the subpages display in order of most recently published.&#x20;

E.g. the page <https://campaign-codenation.nationbuilder.com/about_me> has the tag `Admin Show Profile Page:executive_team`which shows the subpages of the page "executive\_team", in a profile format.

![](/files/-MHKePTMceYoijbaO4Ed)

![Subpages of "executive\_team" page, shown on the About page.](/files/-M5tAEQttxoX5wrYSk7k)


# Signup Bar

Live demo: <https://campaign-codenation.nationbuilder.com/about_me>

Adding the tag `Admin Show Signup Bar` to any page will show a Signup Panel connected to the default signup page. Note this section appears automatically on the homepage, but you can remove it by adding the `Admin Hide Signup Panel` tag.&#x20;

![](/files/-LjpOtKJ0kmtq4dO8aZa)

![](/files/-MHKf4aMQe5xHoIB_TWM)


# SMS Tool

Use this tool to encourage website visitors to send a message to people they know.

<figure><img src="/files/GJMCUoaL2HPJ3aAMci4z" alt=""><figcaption></figcaption></figure>

<figure><img src="/files/fuFWiLVVvgFdqMIhVvqC" alt=""><figcaption></figcaption></figure>

1. Create a **basic** page anywhere on your site
   * The **headline** of the basic page will be the **heading** of the panel
   * The **content** of the basic page will be the **text** on the panel
   * The **share image** of the basic page will be the **image** on the panel
   * The **excerpt** of the basic page will be the **SMS message text** in the popup
   * To change the button text, apply the tag `Admin Button Text:Desired Text` to the basic page where `Desired Text` is the text you want to display on the button.
     * Button text is "Send a message" by default<br>
2. On the page you would like the panel to appear, apply the tag `Admin Show SMS Tool:page_slug` where `page_slug` is the slug of the basic page you created in step 1 above.


# Video Gallery

Live demo: <https://campaign-codenation.nationbuilder.com/video_gallery>

Create you own video gallery!

1- Create a basic page for the video gallery and a basic subpage for each video in the gallery.

2- Add the Youtube video url to the content of the subpage.

3 - Add the tag `Admin Show Video Gallery` to the gallery page OR `Admin Show Video Gallery:page_slug` to a different page where `page_slug` is the slug of the page that holds the basic subpages with the video links as content.

NOTE: Make sure the video pages are published and when pasting the URL be sure to paste it without formatting (i.e. without a hyperlink, underline, etc.).

![](/files/-LjptfuVSZ7k2SUcZvr1)


# Tag Appendix

* [`Admin Show Action Slider`](/campana/admin-tag-customisations/action-slider)
  * `Admin Action Slider`
* [`Admin Show Background Video:page_slug`](/campana/admin-tag-customisations/background-video-section)
* [`Admin Show Quote:page_slug`](/campana/admin-tag-customisations/background-quote-section)
* [`Admin Show Content Panel:page_slug`](/campana/admin-tag-customisations/column-panels)
* [`Admin Cover Fee`](/campana/admin-tag-customisations/cover-donation-fee)
* [`Admin Custom Field:custom_field_slug`](/campana/admin-tag-customisations/admin-custom-field)
* [`Admin Custom Donation Field:custom_field_slug`](/campana/admin-tag-customisations/custom-donation-field-inputs)
* [`Admin Show Donation Panel`](/campana/admin-tag-customisations/admin-donation-panel)
  * `Admin Hide Donation Panel`
* [`Admin Show Embed:page_slug`](/campana/admin-tag-customisations/adding-external-plugins)
* [`Admin Show Event Calendar`](/campana/admin-tag-customisations/event-calendar)
* [`Admin Show Events Map:page_slug`](/campana/admin-tag-customisations/events-map)
  * `Admin Show Events Top Map:page_slug`
* [`Admin Featured Post`](/campana/admin-tag-customisations/featured-blog-post)
* [`Admin Hide Tweet Section`](/campana/admin-tag-customisations/hide-tweet-section)
* [`Admin Show Image Gallery`](/campana/admin-tag-customisations/admin-image-gallery)
* [`Admin Latest News Section`](/campana/admin-tag-customisations/admin-latest-news-section)
  * `Admin Hide Latest News Section`
* [`Admin Nav Button`](/campana/admin-tag-customisations/add-primary-button-pages)
* [`Admin Show Petition:page_slug`](/campana/admin-tag-customisations/feature-petition)
* [`Admin Show Profile Page:page_slug`](/campana/admin-tag-customisations/show-profile-page)
* [`Admin Program:page_slug`](/campana/admin-tag-customisations/event-program-layout)
* [`Admin Show Resources:page_slug`](/campana/admin-tag-customisations/admin-pdf-gallery)
* [`Admin Show Share Bar`](/campana/admin-tag-customisations/admin-share-bar)
* [`Admin Show Share Parent Bar`](/campana/admin-tag-customisations/admin-share-parent-bar)
* [`Admin Show Signup Bar`](/campana/admin-tag-customisations/admin-signup-bar)
  * `Admin Hide Signup Panel`
* [`Admin Show Sms Tool:page_slug`](/campana/admin-tag-customisations/sms-tool)
  * `Admin Button Text:Desired Text`
* [`Admin Show Subpages`](/campana/admin-tag-customisations/showing_subpages)
  * `Admin Show Subpages Panel:page_slug`
* [`Admin Show Video Gallery`](/campana/admin-tag-customisations/admin-video-gallery)
  * `Admin Show Video Gallery:page_slug`


# Image sizes and dimensions

Guidance and advice on recommended image sizes and proportions for optimal display across all sections of your website.

### General tips

You can optimise your images using [tinypng.com](https://tinypng.com/) before uploading them to your site.

### **Featured content slider images**

*These are the photos you can upload to a page under "Settings" > "Featured content sliders". They appear at the top of the page as a header image (or a slider of header images when multiple are uploaded).*

We recommend using 1800 x 600 (i.e. an aspect ratio of 3:1). That said, there is no hard limit or required proportions for these images, so some general rules to follow for optimal display are to ensure:

* a minimum width of 1800px (to guarantee sufficient resolution)
* an aspect ratio between 3:1 and 2:1 (i.e. landscape photos at least twice as wide as they are high, and not more than three times as wide as they are high)
* a uniform size for all header images on the page (i.e. cropping all the photos in your featured content slider to a consistent aspect ratio before you upload them). This ensures a smooth transition between featured content slides if you are using the carousel feature.

### **Thumbnail Images**

*These are the photos that appear automatically when showing a stream of subpages or posts on a page (e.g. in the* [*Latest News section*](https://docs.codenation.com/admin-tag-customisations/admin-latest-news-section) *or when using the* [*Show Subpages feature*](https://docs.codenation.com/admin-tag-customisations/showing_subpages)*).*

We recommend using images that are 1200px wide by 630px high. You can upload these images by navigating to the relevant page in the backend and selecting "**Settings"** then clicking "**Social Media**".

Note that on **redirect pages**, you can navigate to the Social Media settings by going to the page settings, and clicking on the thumbnail image that appears underneath the page name. This will be the site logo by default (i.e. clicking the Campaña logo in the screenshot below)

<figure><img src="/files/H2YhpX2rJ4KcjDsaSY5W" alt=""><figcaption></figcaption></figure>

### **Profile photos**

*These are the images that appear when using the* [*Show Profile feature*](https://docs.codenation.com/admin-tag-customisations/show-profile-page)

For optimal display, we recommend using square profile images. You can crop your photos to ensure consistent proportions before you upload them to each profile page in “**Settings**” > “**Social Media**”. To ensure sufficient resolution, we recommend using images that are 800px wide by 800px high.

### **Content images**

*This category refers to any images you wish to add through NationBuilder's content editor (also known as the "WYSIWYG" editor).*

You can add photos to the content of any NationBuilder page using the image upload tool visible in the screenshot below. The size, spacing and display of these images is controlled by the settings you apply through that content editor, rather than any styles in the theme. You can also click and drag to resize the image once you've uploaded it, just like in [this example gif](https://downloads.intercomcdn.com/i/o/128975920/8d47db902970ae19912ec1f6/Add+images.gif).

![The image upload tool in NationBuilder's "WYSIWYG" content editor](/files/-MCU-qtQbj0W9Gbmw5gT)

When adding images to a page's content, you should always set the image height to 'auto', as shown in the screenshot below. This ensures that the image's height will resize on smaller screens, rather than maintaining its height and appearing distorted and overly large.

<figure><img src="/files/w0a5avmc1tdwz88iRs3w" alt=""><figcaption></figcaption></figure>

**Responsive/fluid-width images**

One option you have is to set your image sizes to be "**fluid**" or "**responsive**" by applying a percentage width, rather than a fixed pixel width. You can also then allow the height to be determined automatically based on the natural proportions of the image.

For example, you may wish to set your images to span the full width of the content section on any device, which is best suited to images with a landscape orientation (i.e. more wide than tall). You can do this in the content editor by selecting the image and clicking the "Insert/edit image" icon in the editor toolbar (labelled "1" in the screenshot above). In the edit dialogue simply enter a width of `100%` and a height of `auto` in the fields labelled "Dimensions". If you decide to display an image at 100% width you should ensure the file you upload is at least 1400px wide to look great on all screen sizes. The screenshot below shows those example settings:

![Setting responsive dimensions for an image in the NationBuilder content editor](/files/-MCU4jlnDnJAUvHCZ-vR)

For more complex requirements, you can open the "Advanced" tab within that "Insert/edit image" dialogue to enter vertical or horizontal spacing or even CSS styles.

**Image alignment**

NationBuilder's WYSIWYG implementation provides a useful option to align images to the left, right or center of the page content. You can see those icons in the editor toolbar.

It's also possible to float images so they sit alongside the text on your page. However, those float options used to wrap text around images generally don't work smoothly across screen sizes and can lead to poor results on smaller devices, so make sure to run a thorough review if experimenting with those options.

**Further information and support**

Given the size, spacing and display of these content images is controlled by the settings you apply through the NationBuilder WYSIWYG not the Candidate theme, **please review the following NationBuilder documentation for more information:**

* <https://support.nationbuilder.com/en/articles/2319376-include-files-and-images-on-a-page#insert-an-image->
* <https://support.nationbuilder.com/en/articles/2319347-edit-content-on-your-webpages#add-images-and-video>


# More Coming Soon


# Tu tema Campaña

**¡Felicitaciones!** ya compraste tu tema *Campaña* creado por *Code Nation* desde [NationBuilder theme marketplace](https://themes.nationbuilder.com/).

Los temas de *Code Nation* son los más funcionales del mercado y están diseñados para crear sitios web orientados a la acción: movilizar campañas políticas, causas sociales o campañas sin ánimo de lucro que necesitan recaudar fondos, crear una comunidad de voluntarios o recolectar firmas para peticiones.

Puedes usar tu tema Campaña en un sitio existente de NationBuilder o en un sitio completamente nuevo.

Si quieres empezar con la estructura básica que hemos usado en el demo de Campaña, [contáctate con nosotros.](https://www.codenation.com/contact_us)

## Usa esta guía paso a paso para lanzar tu sitio web!  🚀

![](/files/-MP3wNqp1qIVH0WoeqRz)


# Crea un nuevo sitio

1 - Regístrate en tu nación con tu usuario y contraseña.

2 - En la barra de navegación lateral, has clic en **Sitio web** y luego has clic en **New website.**

![](/files/-MHOw7BjwFD6WEZFc6Am)

3 - Completa los campos requeridos y elige la opción **Start from a default site**:

![](/files/-LhYYcumLbDyyD0clufW)

**Nota:** si no tienes una cuenta, comienza con una prueba gratuita de NationBuilder [aquí](https://nationbuilder.com/create).


# Activa tu nuevo tema

Después de completar la compra de tu tema de Code Nation en el [NationBuilder theme store](https://themes.nationbuilder.com), puedes activarlo en tu sitio. Necesitas agregarlo en un sitio web existente o en uno nuevo (te recomendamos empezar con un sitio web nuevo a menos que hayas empezado a añadir contenido en un sitio web no publicado).

***Nota:*** NationBuilder se compromete a entregarte tu nuevo tema dentro de las 24 horas posteriores a tu compra. Puedes experimentar un ligero retraso entre el momento de la compra y la posibilidad de activar el tema en tu sitio.

1 - Busca tu sitio en el backend de NationBuilder y has clic en **Tema**. Has clic en **Cambiar a un tema personalizado**, localizar el tema **Campaña** y luego clic en el botón **Cambiar a.**

![](/files/-LhYWinTaWCl8Tt5nnbd)

![](/files/-LhYYk1az56bOVS6wOAh)

2 - Por último, selecciona la paleta de color que mejor se ajuste a tu campaña. (Nota: el video a continuación muestra nuestro tema Candidato, pero los pasos son los mismos para Campaña)

![](/files/-LjneKcnfw1PrLIj1qWj)

<br>


# Configuración de idioma

## ‌Cómo crear una opción de lenguaje alternativo‌

La mayoría de los sitios bilingües construidos en NationBuilder tienen un sitio completo por cada idioma. Aquí es donde entra Campaña.

Para crear una versión en español por separado, siga las instrucciones para crear un nuevo sitio:&#x20;

{% content-ref url="/pages/-LhY9IKs7S3fjJCTBJ8n" %}
[Crea un nuevo sitio](/campana-espanol/ready-to-launch/create-a-new-site)
{% endcontent-ref %}

En el homepage del nuevo sitio agrega la etiqueta `Admin ES` para traducir las variables del sitio a español.


# Conecta un portavoz

**1- Crea un nuevo portavoz**

El portavoz es la voz que representa a tu nación cundo interactúas con tus simpatizantes. Los correos electrónicos y las respuestas automáticas, son enviadas a su nombre.&#x20;

Para configurar un portavoz has clic en **Comunicación,** en la barra de navegación lateral, y luego has clic en **Portavoz nuevo.**

**2- Conecta un portavoz a tu sitio web**

Cuando hayas configurado tu portavoz, dirígete a la pestaña **Ajustes del sitio** y conecta el portavoz.

**3- Sincroniza tus redes sociales**

Conectar redes sociales al portavoz, va a permitir utilizar todas las funciones de NationBuilder. Observa el ejemplo de cómo conectar twitter a continuación (Nota: el video a continuación muestra nuestro tema Candidato, pero los pasos son los mismos para Campaña):

![](/files/-LjoAPDzwheOmZb6Ul9r)


# Conecta tus redes sociales

Tu tema de Code Nation añade links a las redes sociales de tu portavoz automáticamente.

![](/files/-MHJt3eJzOsC1zW-oBne)

Para añadir otras redes sociales con sus iconos, sigue las siguientes instrucciones:

1- Dirígete a la pestaña **Navegación de simpatizante.**\
2- Copia los links de tus redes sociales y has clic en **guardar botones.**\
3- Ya puedes ver los links a tus redes sociales en tu sitio web. (Nota: el video a continuación muestra nuestro tema Candidato, pero los pasos son los mismos para Campaña)

![](/files/-LjoHpL2fuvgsY9rXQu8)


# Conecta Google Analytics

Te recomendamos crear una cuenta gratuita en Google Analytics aquí: [https://analytics.google.com](https://analytics.google.com/).

Cuando tengas tu código, dirígete a la pestaña **Ajustes del sitio** y has clic en **Configuración de analítica.**

El código de Google Analytics tiene el siguiente formato: UA-XXXXXXXXX-X. Copia y pega este número en el campo correspondiente y has clic en **guardar los ajustes de los análisis.**

![](/files/-LjoJ5dGygiP0b0Bccu6)


# SEO y redes sociales

**Permitir acceso a los motores de búsqueda**

La optimización en motores de búsqueda es una parte esencial para impulsar tu sitio web. Existen varias configuraciones que pueden afectar el posicionamiento en buscadores (SEO) de tu sitio web.&#x20;

Lo primero que debes hacer, es autorizar el acceso de los motores de búsqueda a tu sitio web.

Dirígete a **\[Nombre de tu sitio web] > Ajustes del sitio > Básico**.

![](https://downloads.intercomcdn.com/i/o/130177358/7dfd4f205ee0b4acc93694f2/Screen_Shot_2019-06-25_at_1_33_52_PM_1.png)

1\. Asegúrate de que la opción **“Permitir que los motores de búsqueda”** está seleccionada.&#x20;

2\. Has clic en **Guardar sitio.**

### Modificar títulos <a href="#modify-titles-and-headlines" id="modify-titles-and-headlines"></a>

El nombre de tu sitio web y de las páginas individuales pueden afectar el posicionamiento en buscadores.

**Ajustes generales del sitio**

Usa palabras claves en los títulos y slugs para que las personas puedan encontrar tu sitio más fácilmente. Los títulos se encuentran en **Ajustes del sitio > Básico**.![](https://downloads.intercomcdn.com/i/o/130177546/0825dd7d56cd67b3f8d05e99/Screen+Shot+2019-06-25+at+1.38.21+PM.png)

Todos los campos tienen un efecto en el SEO, pero el campo más importantes es “**Título de la página de inicio en los resultados de búsqueda.**”&#x20;

Este es el texto principal que aparecerá en los motores de búsqueda. Se completará automáticamente con el título que ingresaste durante el proceso de instalación. Si quieres cambiarlo, ingresa un título conciso y preciso de tu página de inicio en el campo de texto y has clic en **Guardar sitio.**

**Ajustes de página**

Como en los ajustes del sitio, cada página tiene ajustes que controlan los títulos y el slug. Para cambiar estos ajustes, has clic en **\[Nombre de tu sitio web] > Páginas > Ajustes de página.** Todos los campos afectan el SEO, pero el más importante el título. Este campo se completará automáticamente con el **“Nombre de la página - Nombre del sitio web”.**

![](https://downloads.intercomcdn.com/i/o/130177806/3523703c658fde3bb57dc624/Screen_Shot_2019-06-25_at_1_38_57_PM.png)

Este título es un buen comienzo para empezar con la optimización de tu sitio web. Crea tus títulos siguiendo estos lineamientos:

* Usa palabras claves. Asegúrate de que tus títulos incluyen las palabras más relevantes para tus simpatizantes.&#x20;
* Crea frases completas. Los motores de búsqueda prefieren frases completas.
* Se breve. Intenta mantener tu título en 55 caracteres o menos. Esto asegura que todo el título pueda ser mostrado en los motores de búsqueda.

### Ajustes SEO al nivel de la página <a href="#page-level-seo-settings" id="page-level-seo-settings"></a>

Además de los títulos de las páginas, hay configuraciones de SEO específicas que puedes modificar para ayudar a la optimización. Dirígete a en cualquiera página a **Ajustes > SEO**.![](https://downloads.intercomcdn.com/i/o/108168420/25242b2209b6be0fd49afacf/Screen_Shot_2019-03-11_at_2_06_31_PM.png)

1\. Tendrás la opción de cambiar el **título** de la página, si aún no lo has hecho.

2\. El **slug** de la página también puede afectar la forma en que los motores de búsqueda leen el sitio web. Cambia el **slug** en cualquier momento usando palabras relevantes al contenido.

3\. El **título** de la página es otro lugar donde puedes incluir palabras clave. Este texto aparecerá tanto en la página como en la lista de búsqueda.

4\. Si quieres que el sitio web tenga mayor jerarquía en los motores de búsqueda, el **Extracto de Facebook** es un campo que debes completar con un texto corto de descripción. El extracto aparece en el listado de motores de búsqueda describiendo la página y cuando tus simpatizantes comparten la página en sus perfiles de Facebook. Si dejas este campo en blanco, los motores de búsqueda extraerán las primeras frases del contenido de la página.

5\. Has clic en **Guardar ajustes de redes sociales**.&#x20;

Cuando completes todos los campos, verás en las listas de los motores de búsqueda contenido relevante a tu página.![](https://downloads.intercomcdn.com/i/o/76104949/6de2efeb6d874400efb3678d/Screen_Shot_2018-04-06_at_9_16_48_AM.png)

### Modificaciones en el contenido de la página <a href="#page-content-modifications" id="page-content-modifications"></a>

Hay formas de afectar positivamente su SEO modificando o enriqueciendo el contenido de su página.

Las etiquetas de anclaje de HTML permiten enlazar a páginas fuera del sitio web, a páginas dentro del sitio web o enlazar contenidos dentro de la misma página. Al crear un link dentro de la misma página o a otras páginas del sitio, crea los hipervínculos usando palabras clave. Los motores de búsqueda asociarán estas palabras clave con la página y mejorarán su posición en la lista del motor de búsqueda.

![](https://downloads.intercomcdn.com/i/o/76104952/32fc961d0b62dacbc77a3f5a/Screen_Shot_2018-04-06_at_9_21_29_AM.png)

Ten en cuenta que el SEO puede verse afectado negativamente si incluyes enlaces que no funcionan.&#x20;

Escribe una descripción en las imágenes que uses en el contenido de las páginas, incluyendo palabras clave. Este texto es leído por los motores de búsqueda y considerado en su ranking.

![](https://downloads.intercomcdn.com/i/o/76104954/04b0102e925b2f01e40633d4/Screen_Shot_2018-04-06_at_9_21_17_AM.png)


# Agrega un favicon

Carga el favicon haciendo clic en **Ajustes del sitio.**

![](/files/-LheyHcPg47-LVyyIXmb)


# Agrega un logo

Carga el logotipo haciendo clic en **Ajustes del sitio.** Este logotipo también se utiliza como imagen predeterminada en los recibos de donación y otras secciones del panel de control (por ejemplo, en algunos temas de envío de correos electrónicos)

![Upload your logo under "Site settings" > "Logo"](/files/-Lhen3qRU4AbKZ1HQUda)

**Logotipo para fondos oscuros**

Si tienes un logo distinto para ser usado sobre fondos oscuros, puedes cargarlo en la sección **Archivos** de la página de inicio. El nombre de este archivo debe contener la frase "light-logo". Este logotipo va a usarse de manera automática en las páginas que usen el deslizador de contenido destacado.

No hay un límite estricto en las proporciones requeridas para el logo pero te recomendamos utilizar 1200px x 400px (es decir, una relación de aspecto de 3:1).


# Agrega imágenes destacadas en el deslizador de contenido

El **Deslizador de contenido** aparece en la parte superior de las páginas.

En cualquier página dirígete a **Ajustes > Deslizadores de contenido destacado**. Agrega un nombre en **Etiqueta**. De forma predeterminada, la imagen destacada tiene una superposición blanca en el lado izquierdo (vea la captura de pantalla a continuación), pero puede eliminar esto agregando la palabra 'none' a la etiqueta de la imagen. Alternativamente, puede agregar la palabra 'dark' a la etiqueta de la imagen para agregar una superposición negra sobre la imagen.

![](/files/-MSf3boDCrE1l9krz0sM)

Para mostrar un título de una sola linea, escribe una linea de texto. Para mostrar un título principal y un párrafo, separa las dos partes de tu título con el símbolo "**|**".

Agrega un slug en el campo **Página a destacar.** Esta va a ser la página a la que las personas van a ser re dirigidas al hacer clic en la imagen.&#x20;

Más de una imagen en el **Deslizador de contenido destacado** en la misma página, va a generar un carrusel en lugar de una imagen estática. Todas las imágenes deben tener las mismas medidas o proporciones.

![](/files/-Lhf0BGq-OSb20MwYCAn)

***Nota:***  Si inicias sesión como usuario del panel de control, también puedes usar el botón de edición.

![](/files/-LjoTjZr71nZQ29sxI9o)

### Agregar un control deslizante de contenido destacado a una página de donación v2&#x20;

Se puede notar que no hay una pestaña de controles deslizantes de contenido destacado en la configuración de página de las páginas de donación v2. Sin embargo, aún es posible agregar un control deslizante de contenido destacado a estas páginas, siguiendo los pasos a continuación:&#x20;

1. Navegue a la configuración de la página de donación&#x20;
   1. p.ej. configuración de la página de donación del sitio de demostración del candidato (no podrá acceder a esta página): <https://codenation.nationbuilder.com/admin/sites/184/pages/10287/edit&#x20>;
2. Luego reemplace la edición al final de esa URL con funciones.&#x20;
   1. P.ej. <https://codenation.nationbuilder.com/admin/sites/184/pages/10287/features&#x20>;
3. Eso lo llevará a la sección de la configuración donde puede agregar un control deslizante de contenido destacado, como en cualquier otra página.


# Agrega contenido en el footer

Para actualizar el contenido del **footer** dirígete a **Ajustes del sitio.**

![](/files/-Lhf10SonBTxkr65-1FS)

Por ejemplo 219 19 19 © 2030

***Nota:*** La linea " Diseñado por [Code Nation](https://www.codenation.com/?codenation) usando [NationBuilder](https://nationbuilder.com/?recruiter_id=716045)" es requerida en todos los temas comprados en el [NationBuilder theme marketplace](https://themes.nationbuilder.com/). Contáctate con nosotros en <info@codenation.com> si necesitas alguna personalización.<br>


# Actualiza y ordena la navegación superior

Para ordenar la **Navegación superior** dirígete a **Ajustes del sitio.**

![](/files/-Lhf28D6MzRWTamEWUS5)


# Atajos del panel de control

Si inicias sesión como administrador, puedes navegar el back-end de forma sencilla usando el botón de edición ubicado en la parte inferior derecha de la pantalla.

![](/files/-LjoTjZr71nZQ29sxI9o)

![](/files/-Lheqbo15JL5WhRRe4Lw)


# Crea una página nueva

Los temas de Code Nation incluyen [los 30 tipos de página de NationBuilder.](https://nationbuilder.com/types_of_nationbuilder_pages)

Para crear nuevas páginas, dirígete a **Sitio Web** > **Nueva página,** elige un tipo de página y dale un **Nombre.** El **Slug** se crea automáticamente y es parte de la URL que identificará cada página.

![](/files/-LhgurQuWw3FKBXOZde-)

Vas a encontrar los siguientes campos en todas las páginas: **Nombre, Titulo, Slug** y **Etiquetas** (separadas por comas), también la opción de crear **Deslizadores de contenido**, **SEO, Redes Sociales** o **Miniaturas.**

![](/files/-LhgwtJtyJnZwfcH9fUE)

Las imágenes de **Redes Sociales** o **Miniaturas** pueden cargarse en **Ajustes** > **Redes sociales** en todas las páginas, sub páginas, entradas de blog o eventos.&#x20;

En algunos casos, esta imagen aparecerá como miniatura. Por ejemplo, las entradas de blog y eventos necesitan miniaturas para mostrar en las páginas tipo Blog y Calendario respectivamente. También las miniaturas se muestran en las secciones de últimas noticias o últimas eventos.

![](/files/-LhgxzxDSIcZBTo5T0tx)

Para crear una sub-páginas, dirígete a **Sub-páginas** y has clic en **Nueva sub-página.**

![](/files/-Lhgz5YVILIaQC2WYK7g)


# Etiquetas

Las etiquetas son una excelente manera de permitir que los seguidores busquen contenido relacionado. En el panel de control, dirígete a **Etiquetas**. Aquí puedes editar, crear o eliminar etiquetas.

![](/files/-Lhej2B8p8N5uIGibb2F)

Para agregar una etiqueta a una página, navega a la página de tu nación y añade la etiqueta como se muestra a continuación:

![](/files/-LjoXhtqjb4XtpHVQiuz)

Las etiquetas aparecerán en el contenido de la página en vivo como un enlace a otras páginas etiquetadas de la misma manera.

<div align="left"><img src="/files/-LjoX2-d_0JGEF9Jef6a" alt=""></div>

***Nota:*** Las etiquetas personalizadas que contienen "**Admin**" no se muestran en el sitio web.


# Paneles de columna

## How to add panels:

Demo en vivo: <http://campana.codenation.com/>

Agrega la etiqueta `Admin Show Content Panel:[PAGE_SLUG]` a la página donde quieres que aparezcan los paneles, por ejemplo:&#x20;

`Admin Show Content Panel:about`

En el contenido de la página “about” agrega 2 líneas horizontales (`<hr>`) al final de cada columna. Mira la imagen a continuación:

![](https://gblobscdn.gitbook.com/assets%2F-LeL-FYaRUlvUn8HHUaD%2F-MJ57STOdYlHmWugpbB8%2F-MJ7279MzU0I8dwFmbo5%2FScreen%20Shot%202020-10-08%20at%2010.50.27%20pm.png?alt=media\&token=2520d92c-76a8-49e4-a424-22de709a1aff)

​[<br>](https://docs.codenation.com/v/campana/general-1/featured-pages)

![](https://gblobscdn.gitbook.com/assets%2F-LeL-FYaRUlvUn8HHUaD%2F-MJ57STOdYlHmWugpbB8%2F-MJ706VKzkRVfbprRyn4%2FScreen%20Shot%202020-10-08%20at%2010.41.35%20pm.png?alt=media\&token=5e4c752f-ad9a-4c39-bac2-886c7e05ee33)


# Agenda de Eventos

## Para agregar una agenda de eventos:

1. Crea una página básica con sub-páginas básicas para cada día de la agenda.
2. Navega a la página donde quieras que aparezca la agenda de eventos.
3. Agrega la etiqueta "`Admin Program:[page_slug]`" donde "\[page\_slug]" es el slug de la página creada en el paso 1.

Revisa el gif a continuación y el demo en: <https://campana.codenation.com/agenda_de_eventos>

<figure><img src="/files/8Loxb6D4Mo0zQd3GWjWJ" alt=""><figcaption></figcaption></figure>


# Acordeones Plegables

## ‌Acordeón (contenido expandible)

Los Acordeones pueden comprimir o expandir una serie de bloques de texto con un solo clic, y eso mejora enormemente la experiencia de usuario de tu página.

### ¿Qué son los acordeones?

**‌Un acordeón** es un componente que organiza el contenido dentro de elementos plegables.

‌**Los Acordeones** pueden comprimir o expandir una serie de bloques de texto con un solo clic, y eso mejora enormemente la experiencia de usuario de tu página.

![](https://gblobscdn.gitbook.com/assets%2F-LeL-FYaRUlvUn8HHUaD%2F-MJ9fkXStaNtkIqDTdPc%2F-MJ9hmOO56GXJKdSMeCH%2FzNucsXrzC4.gif?alt=media\&token=857817d3-1aca-447f-976c-5d51ab60ee55)

## **¿Cómo agregar un acordeón / Contenido expandible?** <a href="#how-to-add-an-accordion-collapsed-content" id="how-to-add-an-accordion-collapsed-content"></a>

En el contenido de una página agrega 2 lineas horizontales‌ (\<hr>) al comienzo del título y al comienzo del contenido. Mira la imagen a continuación:[<br>](https://docs.codenation.com/v/campana/admin-tag-customisations/column-panels)

![](https://gblobscdn.gitbook.com/assets%2F-LeL-FYaRUlvUn8HHUaD%2F-MJ9fkXStaNtkIqDTdPc%2F-MJ9iUhqE5JzRdUbea66%2FScreenshot%202020-08-01%2012.52.30.png?alt=media\&token=8ef4f68f-eac9-4f75-845f-8ab7ec768f15)


# Cubrir la tarifa de donación

Agrega la etiqueta "Admin Cover Fee" en cualquier página de tipo donation\_v2, para agregar la casilla de verificación "Quiero cubrir la tarifa de procesamiento de pagos" en la parte inferior de su formulario de donación.&#x20;

Esto luego calculará sus tarifas de procesamiento de pago y lo agregará al valor de la donación que su patrocinador haya seleccionado. Tenga en cuenta que las tarifas de procesamiento se calculan a una tasa de 2.9% + 30c\*&#x20;

Vea esto en acción en <https://campaign.codenation.com/donation\\_v2>

![](/files/gsmkF0469xM64kHEDa4r)

\* o 0,3 de cualquier unidad de moneda que utilice su sitio


# Página de Recursos

Demo en vivo: <https://campana.codenation.com/recursos>

1. Crea una subpágina por cada recurso
2. Sube tu documento adjunto bajo la sección Archivos de la supágina

{% hint style="info" %}
Puedes crear una página de redireccionamiento como una subpágina para archivos alojados externamente. Esto funciona muy bien para Google docs o archivos de más de 10 MB
{% endhint %}

![](https://gblobscdn.gitbook.com/assets%2F-LeL-FYaRUlvUn8HHUaD%2F-MJ72YFf6zJkqVxATK1G%2F-MJ72ziseqIYFUBLwYmK%2FScreen%20Shot%202020-10-08%20at%2010.54.12%20pm.png?alt=media\&token=d7a2bfee-9132-403c-85e7-9f0e858a5c84)

[<br>](https://docs.codenation.com/v/campana/admin-tag-customisations/collapsed-accordions)


# Carrusel de Acción

## **Cómo agregar un carrusel de acción a alguna página**

1. Agrega la etiqueta  `Admin Show Action Slider`  a la página donde quieres que aparezca el carrusel.
2. Agrega la etiqueta `Admin Action Slider` a cualquier página que le gustaría incluir en el carrusel.
3. Agregue una imagen para compartir y un texto corto para que aparezca en el carrusel.

![](https://gblobscdn.gitbook.com/assets%2F-LeL-FYaRUlvUn8HHUaD%2F-MJ9vxbnUSd6m-kseWuf%2F-MJ9wyxPW61xBooPxRMW%2FScreen%20Shot%202020-10-09%20at%2012.22.22%20pm.png?alt=media\&token=a0fac055-a929-4996-a1ee-a737402d99a1)


# Petición destacada

## Cómo agregar una petición destacada a alguna página‌

1. Agrega la etiqueta `Admin Show Petition:[slug_petición]` en la página donde quieres que aparezca la petición.

{% hint style="warning" %}
Esta etiqueta sólo debe ser usada en páginas básicas, por ejemplo, la página de inicio.
{% endhint %}

![](https://gblobscdn.gitbook.com/assets%2F-LeL-FYaRUlvUn8HHUaD%2F-MJ9x0tFeE6gOCHZIztN%2F-MJ9ySvjhbFGoKfP9_3o%2FScreen%20Shot%202020-10-09%20at%2012.28.45%20pm.png?alt=media\&token=91cafdaa-c018-404a-8105-013f8a3e3ece)


# Video Destacado

**Demo:** [**https://campana-codenation.nationbuilder.com/​**](https://campana-codenation.nationbuilder.com/​)

1. Crea un nuevo destacado Página > Carrusel de contenido destacado
2. En la etiqueta incluye la palabra "Fondo"
3. En "Página para destacar", agrega el slug de una página que tenga una URL de Youtube en el contenido de la página..
4. Sube una imagen para que sea la imagen por defecto mientras se carga el video.

![](https://gblobscdn.gitbook.com/assets%2F-LeL-FYaRUlvUn8HHUaD%2F-MJ72YFf6zJkqVxATK1G%2F-MJ7EQvolBqNiJ6Z4CAP%2FScreen%20Shot%202020-10-08%20at%2011.44.02%20pm.png?alt=media\&token=5f55a6b1-9d55-4ab6-a3de-b31674f55948)


# Calendario de eventos

## Cómo agregar una vista de calendario de eventos

Ejemplo en vivo: <https://campana.codenation.com/events_calendar​>

1. Crea una página tipo calendario o navegue a un calendario existente
2. Agregar la etiqueta `Admin Show Event Calendar`
3. Los eventos aparecerán automáticamente en la vista de calendario como se muestra a continuación:

![](https://gblobscdn.gitbook.com/assets%2F-LeL-FYaRUlvUn8HHUaD%2F-MJ72YFf6zJkqVxATK1G%2F-MJ7Ddt4mKVpCUnB0dSS%2FScreen%20Shot%202020-10-08%20at%2011.40.55%20pm.png?alt=media\&token=dd7b14e0-9009-4cbb-95b9-dcbd7614bd9a)


# Sección con video de fondo y cita

Demo: <https://campana-codenation.nationbuilder.com/>

1- Crea una nueva página básica y luego copia y pega la URL de YouTube en el contenido. Asegúrate de [pegar y combinar estilos](https://lmgtfy.com/?q=paste%20and%20match%20style%20shortcut\&s=g) cuando añadas el video.

![](/files/-MHJxT7HCEFPNHzyUcqJ)

2- Agrega la etiqueta `Admin Show Background Video:[slug_del_video]`  a la página donde quieres que aparezca el video. Por ejemplo`Admin Show Background Video:celebracion`&#x20;

3- Puedes superponer una cita en el video agregando un título a la página del mismo.

![](/files/-MHK0aOeF7qrj-OfIebV)

4- Dado que los videos de fondo no son compatibles con muchos dispositivos móviles, puedes configurar una imagen alternativa para usarla como fondo de esta sección en pantallas más pequeñas. Para hacer esto, sube una foto de fondo en la sección de  **Redes Sociales** de la página.


# Sección con imagen de fondo y cita

Demo: <https://campana-codenation.nationbuilder.com/dos_columnas>

1- Crea una nueva página básica y agrega la cita en la sección de contenido de la página.

2- Sube una imagen de fondo en **Ajustes > Redes Sociales**&#x20;

3- En la página donde quieres que aparezca la cita, agrega la etiqueta`Admin Show Quote:[slug_de_cita]`. Por ejemplo `Admin Show Quote:cita_de_equipo`&#x20;

No hay un límite estricto en las proporciones requeridas para estas imágenes pero te recomendamos utilizar 1800px x 600px (es decir, una relación de aspecto de 3:1).

Sigue estas reglas generales para asegurar una visualización óptima:

* Tu imagen debe tener un ancho mínimo de 1800px (para garantizar una buena resolución)
* Tu imagen debe tener una relación de aspecto entre 3:1 y 2:1 (es decir, as fotos deben tener al menos el doble de ancho que alto, y no ser tres veces más anchas que altas).
* Recorta todas las imágenes que vas a usar en el control deslizante al mismo tamaño.&#x20;

&#x20;[Encuentra más recomendaciones para tus imágenes aquí](https://docs.codenation.com/v/candidato/tips/photos)

![](/files/-LjpaT5ZLzgiEHfuM588)


# Campos personalizados en la base de datos

¿Quieres preguntar algo en una página de acción que no está disponible en los campos estándar de NationBuilder? La buena noticia es que los temas de Code Nation admiten **campos dinámicos personalizados**.

**¿Que son los campos dinámicos personalizados?**

Usando etiquetas Admin, puedes agregar campos personalizados a cualquier página de acción en el sitio. Lee más sobre los campos personalizados aquí: <https://nationbuilder.com/when_to_use_custom_fields>.

1- Para crear un campo personalizado has clic en **Ajustes,** en la barra de navegación lateral, y luego has clic en **Los campos personalizados.**\
2- Dirígete a la página en la que quieres agregar el campo.\
3- Agrega la etiqueta "`Admin Custom Field:[slug_campo_personalizado]`" (ej. Admin Custom Field:hear\_about\_us)

(Nota: el video a continuación muestra nuestro tema Candidato, pero los pasos son los mismos para Campaña)

![](/files/-LjoaVuomXHHIlLrQVaU)


# Panel de donación

Demo: <https://campana-codenation.nationbuilder.com/>

Si tu sitio tiene una página tipo donativo, verás automáticamente un panel de donación debajo del control deslizante de contenido destacado en la página de inicio. Puedes **ocultar** este panel agregando la etiqueta `Admin Hide Donation Panel` a la página de inicio.

Puedes **mostrar** este panel en cualquier página agregando la etiqueta `Admin Show Donation Panel`.

![](/files/-MHK2AH-BT2rqSGZnlYM)

El texto se puede modificar en el campo **título** de la página de donación predeterminada.


# Eventos ubicados en el mapa

Demo: <https://campaign-codenation.nationbuilder.com/>

1- Crea una página tipo calendario y agrega tus eventos.

2- Agrega la etiqueta `Admin Show Events Map:[slug_de_calendario]` a la página donde quieres que aparezca el video. ej. `Admin Show Events Map:proximos_eventos`

![](/files/-MHKCs1GGx6jlYLppJTm)


# Plugins externos

Demo: <https://campana-codenation.nationbuilder.com/plugins>

Si bien puedes crear una plantilla de página personalizada y agregar código directamente a una página, ¡Con ***Candidato*** puedes crear una sección incrustada sin tocar el código! (ej. [Juicer.io](https://docs.codenation.com/campana-espanol/admin-tag-customisations/www.juicer.io), [Dogooder](https://dogooder.co/))

1- Crea una página básica para copiar el código del plugin que quieres agregar.

2- Copia el fragmento de código que el plugin ha generado en el Extracto de Facebook que encuentras en **Ajustes > Redes sociales > Extracto de Facebook**

3- En la página donde quieres que aparezca el contenido incrustado, agrega la etiqueta `Admin Show Embed:[slug_de_plugin]`. ej. `Admin Show Embed:social_media_stream`

![](/files/-MHKDriTjnfYihvwKuIy)

<br>


# Video destacado

Demo: <https://campana-codenation.nationbuilder.com/>

1- Crea un nuevo deslizador de contenido destacado en **Página > Deslizadores de contenido destacado.**&#x20;

2- En la página que quieres mostrar el video, agrega el slug de una página que tiene la URL de Youtube en el contenido de la página.&#x20;

3- La página que tiene la URL del video de youtube, debe contener la palabra "video" en el slug. (ej. video\_1).

![](/files/-MHKEHw-_7nTmKg5E5b3)


# Galería de imágenes

Demo: <https://campana-codenation.nationbuilder.com/galeria_de_imagenes>

1- Crea una página básica para mostrar tu galería de imágenes y agrega la etiqueta `Admin Show Image Gallery`\
2- Crea una página básica para cada álbum de imágenes (ej. Evento Anual 2036)\
3- Agrega las imágenes de tu álbum en el deslizador de contenido destacado en **Ajustes > Deslizadores de contenido destacado**

![](/files/-MHKMDLjIV8XhoGw4CFR)

![](/files/-MHKMIGCnNQ4uDDfyWCB)


# Sección de últimas noticias

Demo: [https://campana-codenation.nationbuilder.com/](https://campana-codenation.nationbuilder.com/noticias)

Si tu sitio tiene una página tipo blog, verás automáticamente una sección de Últimas Noticias. Puedes **ocultar** esta sección agregando la etiqueta `Admin Hide Latest News Section` la página de inicio.

Puedes **mostrar** esta sección en cualquier página agregando la etiqueta `Admin Latest News Section`.

La sección de Últimas Noticias muestra las 3 entradas de blog más recientes publicadas en el blog del sitio. Verás la imagen de Redes sociales, el título, una parte del contenido y un botón de leer más.  Sube una imagen de redes sociales en cada entrada de blog para mostrar una miniatura en **Ajustes > Redes Sociales.** Si no subes ninguna imagen, vas a ver una foto por defecto con tu logo superpuesto.

![](/files/-MHKMrF_C1bZ07yLnDGw)


# Botones de acción en la navegación superior

Los botones de acción impulsan a los seguidores a participar en las páginas de acción más importantes.

![](/files/-MHKNHbpzvrA5vsngPSz)

Por defecto, el tema Candidato agregará las páginas predeterminadas de inscripción, donativo e inscripción de voluntarios (si existen). Para configurar estas páginas, dirígete a **Páginas > Predeterminadas.**

![](/files/-MHKNX7Wi7ln6AG1xAp4)

Para elegir diferentes botones de acción, agrega la etiqueta **`Admin Nav Button`** en la página que quieres promover.


# Galería de PDF (Página de recursos)

Demo: <https://campana-codenation.nationbuilder.com/recursos>

1. Crea una página básica y añade la etiqueta `Admin Show PDF Gallery`.
2. Crea una sub-página para el PDF.
3. Sube el archivo PDF en la sección de **Archivos.**

![](/files/-LjpM_fVn2NCur5L1ePD)


# Panel de compartir en redes sociales

Demo: <https://campana-codenation.nationbuilder.com/sobre_nosotros>

Agrega la etiqueta `Admin Show Share Bar` para mostrar una barra con botones de Facebook y Twitter invitando a tus simpatizantes a compartir la página actual.

![](/files/-MHKQX3qZ8Jh_-jns65C)


# Panel de compartir en redes sociales de la página de navegación superior

Agrega la etiqueta `Admin Show Share Parent Bar` para mostrar una barra con botones de Facebook y Twitter invitando a tus simpatizantes a compartir la página de nivel superior (parent), de la página actual.

![](/files/-MHKQw3kTWMrS8nWXgcr)


# Mostrar sub-páginas

Demo: <https://campana-codenation.nationbuilder.com/what_i_stand_for>

Agrega la etiqueta `Admin Show Subpages` para mostrar las sub-páginas de una págin&#x61;**.** Estas sub-páginas incluyen la miniatura, título, fragmento del contenido y el botón de leer más. Sube la miniatura en **Ajustes > Redes sociales.**

También puedes mostrar las sub-páginas de una página específica agregando la etiqueta`Admin Show Subpages Panel:[slug_de_página]`  - ej. la página de inicio de Candidato tiene la etiqueta `Admin Show Subpages Panel:what_i_stand_for` que muestra las sub-páginas de la página con el slug "what\_i\_stand\_for".

![](/files/-MHKSln6sD-ErBFefeP8)

![](/files/-MHKS8SSVTBMYqUIhEU5)


# Mostrar perfiles

Demo: <https://campana-codenation.nationbuilder.com/sobre_nosotros>

La etiqueta `Admin Show Profile Page:[slug_de_página]` funciona de manera similar a la etiqueta `Admin Show Subpages Panel:[slug_de_página]`(ver 'Mostrar sub-páginas' para leer más).&#x20;

Agregando la etiqueta`Admin Show Profile Page:[slug_de_página]` se mostrarán las sub-páginas de la página correspondiente al slug definido en el campo \[`slug_de_página`]. Estos perfiles incluyen un título, miniatura y contenido. Sube la miniatura en **Ajustes > Redes sociales.**

Ej. La página <https://campana-codenation.nationbuilder.com/what_i_stand_for> del sitio web de Campaña, tiene la etiqueta `Admin Show Profile Page:equipo` que muestra las sub-páginas de la página con el slug "equipo", en un formato de perfiles.

![](/files/-MHKbJokmx2EC2eGz3zr)

![](/files/-MHKdo_qRirZjTVkAg1N)


# Panel de inscripción

Demo: <https://campana-codenation.nationbuilder.com/sobre_nosotros>

Agrega la etiqueta `Admin Show Signup Bar` en cualquier página para mostrar barra de inscripción. Este formulario estará conectado a la página de inscripción predeterminada en **Páginas > Predeterminadas.**&#x20;

![](/files/-LjpOtKJ0kmtq4dO8aZa)

![](/files/-MHKetXceUOdSx9l7L2L)


# Contenido en dos columnas

Demo: <https://campana-codenation.nationbuilder.com/dos_columnas>

Agrega la etiqueta `Admin Two Columns` para dividir en dos columnas el contenido de una página básica. Útil para dividir contenidos largos.

![](/files/-MHKfECe3a1vBM1qCW1E)


# Galería de videos

Demo: <https://campana-codenation.nationbuilder.com/galeria_de_videos>

1- Crea una página básica para la galería de videos y agrega la etiqueta `Admin Show Video Gallery` .

2- Crea una sub-página básica para cada video de la galería. Copia la URL del video de Youtube en el contenido.

***Nota:*** Asegúrate de que las páginas que contienen los videos estén publicadas y que al copiar y pegar la URL hayas combinado los estilos.

![](/files/-MHKfVBTaen1h7JRVvp8)


# Compartir por SMS

Utiliza esta herramienta para animar a los visitantes del sitio web a enviar un mensaje a las personas que conocen.

<figure><img src="/files/PP0RQnvXkYeB28X1BPbt" alt=""><figcaption></figcaption></figure>

<figure><img src="/files/g5SvhhU5zZE8ND1YOxw0" alt=""><figcaption></figcaption></figure>

1. Crear una página básica en cualquier lugar de tu sitio.
   * El **título** de la página básica será el **encabezado** del panel.
   * El **contenido** de la página básica será el **texto** en el panel.
   * La **imagen compartida** de la página básica será la **imagen** en el panel.
   * El **extracto** de la página básica será el **texto** **del** **mensaje** **SMS** en el popup.
   * Para cambiar el texto del botón, aplica la etiqueta `Admin Button Text: Texto Deseado` a la página básica, donde `Texto Deseado` es el texto que deseas mostrar en el botón.
     * Por defecto, el texto del botón es "Enviar un mensaje".
2. En la página en la que desees que aparezca el panel, aplica la etiqueta `Admin Show SMS Tool:page_slug`, donde `page_slug` es el slug de la página básica que creaste en el paso 1 anterior.


# Fotos

### Recomendaciones Generales

Puedes optimizar las imágenes que quieres usar en [tinypng.com](https://tinypng.com/) antes de subirlas a tu sitio web.

### Imágenes para el **deslizador de contenido destacado**

*Estas son las fotos que puedes cargar en una página en **Ajustes > Deslizadores de contenido destacado**. Aparecen en la parte superior de la página como una imagen de encabezado o un carrusel cuando cargas varias imágenes.*

No hay un límite estricto en las proporciones requeridas para estas imágenes pero te recomendamos utilizar 1800px x 600px (es decir, una relación de aspecto de 3:1).

Sigue estas reglas generales para asegurar una visualización óptima:

* Tu imagen debe tener un ancho mínimo de 1800px (para garantizar una buena resolución)
* Tu imagen debe tener una relación de aspecto entre 3:1 y 2:1 (es decir, as fotos deben tener al menos el doble de ancho que alto, y no ser tres veces más anchas que altas).
* Recorta todas las imágenes que vas a usar en el control deslizante al mismo tamaño. Esto garantiza una transición fluida entre las imágenes si estas utilizando la función de carrusel.

### **Miniaturas**

*Estas son las fotos que aparecen automáticamente cuando se muestra una secuencia de sub-páginas o publicaciones en una página (por ejemplo, en la sección* [*Últimas noticias*](https://docs.codenation.com/v/candidato/admin-tag-customisations/admin-latest-news-section) *o cuando se usa la función* [*Mostrar sub-páginas*](https://docs.codenation.com/v/candidato/admin-tag-customisations/showing_subpages)*).*

Recomendamos usar imágenes que tengan 1200px de ancho por 630px de alto. Para subir esta imagen, dirígete en la página correspondiente a **Ajustes** **>** **Redes sociales**.

### **Fotos de perfil**

*Estas son las imágenes que aparecen cuando se usa la función de* [*Mostrar perfiles*](https://docs.codenation.com/v/candidato/admin-tag-customisations/show-profile-page)*.*

Para una visualización óptima recomendamos utilizar imágenes cuadradas. Para subir esta imagen, dirígete en cada una de las páginas de perfil a **Ajustes** **>** **Redes sociales**. Para garantizar una buena resolución, recomendamos utilizar imágenes de 800px de ancho por 800px de alto.

### **Imágenes en el contenido**

*Estas son las imágenes que agregas a través del editor de contenido de NationBuilder (también conocido como el editor "WYSIWYG").*

Puedes agregar fotos al contenido de cualquier página de NationBuilder usando la herramienta de carga de imágenes que puedes ver en la captura de pantalla a continuación.&#x20;

![Herramienta imágenes del editor de contenido de NationBuilder](/files/-MCU-qtQbj0W9Gbmw5gT)

El tamaño, el espaciado y la visualización de estas imágenes se configura a través del editor de contenido. También puedes hacer clic y arrastrar la imagen para cambiar el tamaño cuando la hayas incluido en el contenido de la página [como lo explica este ejemplo.](https://downloads.intercomcdn.com/i/o/128975920/8d47db902970ae19912ec1f6/Add+images.gif)

**Imágenes responsive o de tamaño flexible**

Puedes configurar los tamaños de las imágenes para que sean "**responsive**" o "**flexibles**" aplicando un ancho porcentual en lugar de un ancho en píxeles. La altura puede determinarse automáticamente en función de las proporciones naturales de la imagen.

Por ejemplo, es posible que quieras configurar las imágenes para que abarquen todo el ancho de la sección de contenido en cualquier dispositivo, que es el adecuado para imágenes con una orientación horizontal (es decir, más ancho que alto). Puedes hacer esto en el editor de contenido seleccionando la imagen y haciendo clic en el icono "Insert/edit image" en la barra de herramientas del editor (etiquetada "1" en la captura de pantalla de la sección anterior). En el diálogo de edición, ingresa un ancho de `100%` y un alto de `auto` en los campos de "Dimensions". Si quieres mostrar una imagen con un ancho del `100%`, asegúrate de que la imagen que subas tenga al menos 1400 px de ancho para asegurar una buena resolución en todos los tamaños de pantalla.

![Ajuste de dimensiones a una imagen responsive o de ancho fluido](/files/-MCU4jlnDnJAUvHCZ-vR)

Para ajustes más complejos, dirígete a la pestaña "**Advanced**" para modificar el espaciado vertical u horizontal o incluso añadir estilos CSS.

**Alineación de imágenes**

El editor de contenido de NationBuilder proporciona opciones para alinear imágenes a la izquierda, derecha o al centro del contenido de la página. Puedes ver esos iconos en la barra de herramientas del editor.

También es posible hacer flotar las imágenes para ubicarlas junto al texto de la página. Sin embargo, estas funciones flotantes generalmente presentan algunos problemas de visualización en pantallas pequeñas. Si vas a usar estas funciones, asegúrate de hacer una revisar tu sitio web en distintos tamaños de pantalla.

**Más información y soporte**

El tamaño, el espaciado y la visualización de las imágenes que incluyes en el contenido de las páginas, están controlados por la configuración aplicada a través del editor de contenido de NationBuilder (WYSIWYG). **Revisa la siguiente documentación de NationBuilder para obtener más información:**

* <https://support.nationbuilder.com/en/articles/2319376-include-files-and-images-on-a-page#insert-an-image->
* <https://support.nationbuilder.com/en/articles/2319347-edit-content-on-your-webpages#add-images-and-video>


# Pronto más contenido


# Your Code Nation Theme

Congrats on purchasing the Candidate theme by Code Nation, from the [NationBuilder theme marketplace](https://themes.nationbuilder.com/)!

Code Nation's themes are the most functionally advanced themes on the market. Candidate is designed for action oriented political, advocacy, and non-profit campaigns that need to fundraise, collect volunteers, or chase petition signatures.

The Candidate theme can be applied to an existing NationBuilder site or a completely new one!&#x20;

If you would like to start with the base Candidate site structure please reach out to us by clicking the link below.

[Any questions? Get in touch!](https://www.codenation.com/contact_us)

## You can now use this step-by-step guide to launch!  🚀

<figure><img src="/files/-Ljq28oHF-qPckd-j0pu" alt="The Candidate Theme"><figcaption><p>The Candidate Theme</p></figcaption></figure>


# Creating a new site

This guide will walk you through the process of creating your new site step-by-step.

## Creating your new site:

1. Login to your nation with your username and password.
   * If you don't have an account you can create a free trial at NationBuilder [here](https://nationbuilder.com/create).
2. Using the sidebar navigate to **Website** and select the **+ New Site** option. E.g.

<figure><img src="/files/-LhYIEVyquwY6puUHsQY" alt="&#x22;+ New Site&#x22; option in NationBuilder" width="563"><figcaption><p>"+ New Site" option in NationBuilder</p></figcaption></figure>

3. Make sure to provide all the necessary information in the required fields.
   * We recommend selecting the option to start from a default site. This option will provide you with a pre-configured template to kickstart your new site.

<figure><img src="/files/-LhYYcumLbDyyD0clufW" alt="NationBuilders new site form"><figcaption><p>NationBuilders new site form</p></figcaption></figure>


# Activating your new theme

Learn how to apply your new Candidate theme on a new or existing site.

Congratulations on your new purchase of the Candidate Code Nation theme from the [NationBuilder theme store](https://themes.nationbuilder.com)! If you don't have an existing site, we recommend starting with a brand new one, unless you've already added content to an unpublished site.&#x20;

* To get started with creating a new site, follow our helpful guide [here](https://docs.codenation.com/ready-to-launch/create-a-new-site).&#x20;

{% hint style="warning" %}
*As the manager of the theme marketplace, NationBuilder will issue your new theme, which they commit to delivering within 24 hours of your purchase. As such, you may experience a slight delay between purchasing your theme and being able to apply it to your site.*
{% endhint %}

## Applying the Candidate Theme:&#x20;

1. Navigate to **Websites > Your Site** in Nationbuilders sidebar

<figure><img src="/files/-LhYWinTaWCl8Tt5nnbd" alt="Finding your site example" width="563"><figcaption><p>Finding your site</p></figcaption></figure>

2. Using the tab menu click **Theme** then select **Switch to a custom theme**.&#x20;
3. Find the Candidate theme in the list of available themes and click the **Switch To** button beside the  **Code Nation** theme you purchased to apply it your site.&#x20;

<figure><img src="/files/-LhYYk1az56bOVS6wOAh" alt="Finding and applying your Candidate theme" width="563"><figcaption><p>Finding and applying your theme</p></figcaption></figure>

4. You will now be redirected to a menu where you can select your theme colours. We recommend selecting whichever colour style best suits your campaign.

<figure><img src="/files/-LjneKcnfw1PrLIj1qWj" alt="Switching the colour style for your CodeNation theme" width="563"><figcaption><p>Switching the colour style</p></figcaption></figure>


---

[Next Page](/llms-full.txt/1)